As a Systems Engineer I am constantly looking for ways to improve processes as well as look for ways to automate everything I possibly can. As a general rule of thumb, I try to automate myself out of a job so everything can run silky smooth should I ever get hit by a bus. Since I work primary in Microsoft 365 and Azure AD, I thought it would be great to share what I’ve learned in order to use that automation for Exchange Online. With that said, this article is going to be geared around Exchange Online Certificate Based Authentication and the steps to go 100% Passwordless.
Table Of Contents
Requirements
In order to set this up without failure, there are a few things needed to get you on your way to using Exchange Online certificate based authentication. Let’s cover what’s needed right now.
- A certificate, either self signed or one issued by PKI
- Azure Application Administrator or Global Administrator
- Privilege Role Administrator or Global Administrator
- Exchange Online Management PowerShell module
Above are the requirements to allow you to connect to Exchange Online using certificates. I manage Exchange Online using PowerShell so I added that as well. If you’re looking for instructions on how to get that installed, check out this article to install the Exchange Online Management module for PowerShell.
Create a Self-Signed Certificate
First things first, I thought it would be best to start off by creating the self-signed certificate to get the ball rolling. If possible, I would recommend using a certificate issued by a public key infrastructure (PKI). The reason for that is because we know we can trust it, it is inherently more secure, and we can also revoke the cert should the situation call for it. The problem is not every environment has a PKI setup (my lab included).
As mentioned, we don’t have a PKI in our environment so we’ll make due with a self signed certificate. Luckily, Azure does support self signed certs so let’s get that created within PowerShell.
With PowerShell open, enter in the following:
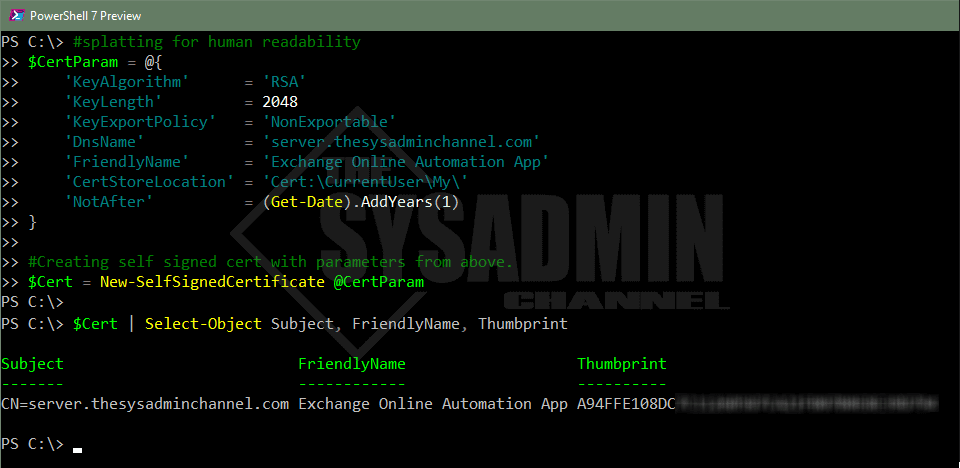
#splatting for human readability
$CertParam = @{
    'KeyAlgorithm'      = 'RSA'
    'KeyLength'         = 2048
    'KeyExportPolicy'   = 'NonExportable'
    'DnsName'           = 'server.thesysadminchannel.com'
    'FriendlyName'      = 'Exchange Online Automation App'
    'CertStoreLocation' = 'Cert:\CurrentUser\My\'
    'NotAfter'          = (Get-Date).AddYears(1)
}

#Creating self signed cert with parameters from above.
$Cert = New-SelfSignedCertificate @CertParam
The above parameters do not allow you to export the certificate to another machine. I should also note that this is saving the certificate under the user context. If you want to store the certificate under the local machine context, you will need to run PowerShell as an administrator anytime you to connect. Allowing it under the local machine certificate store means other administrators on the machine would also be able to connect. So just be aware.
Now that we have the cert created, let’s export it so we can upload it to Azure when we create our application.
#Since we captured the output to the $Cert variable in our previous step.
#We will use that to specify the cert parameter.
#The .cer file will exported to the user's desktop.

Export-Certificate -Cert $Cert -FilePath $Home\Desktop\ExchangeOnlineAutomation.cer
Create an Azure App Registration and Service Principal
To get started, we need to make sure we have the proper rights to get the application created. This is where you will need an Azure AD Application administrator (or Global administrator).
Within Azure AD:
- Navigate to App registrations → New registration
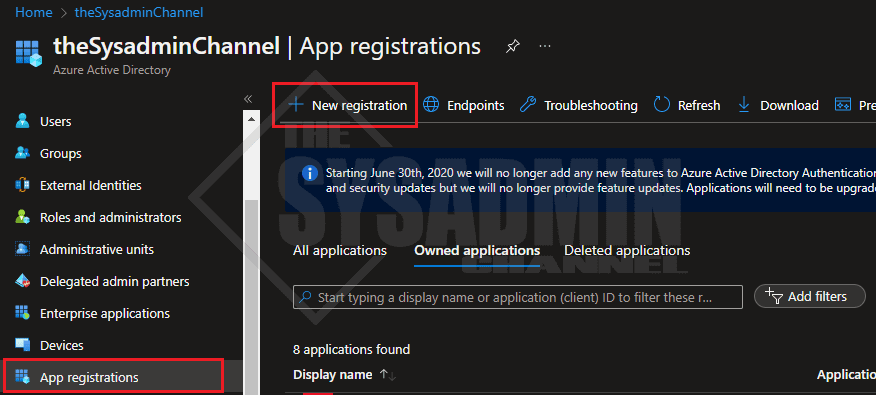
- Name your application accordingly. I’ve named mine Exchange Online Automation
- Select Accounts in this organizational directory only (Single tenant)
- Leave the Redirect URI empty
- Click Register to create the app

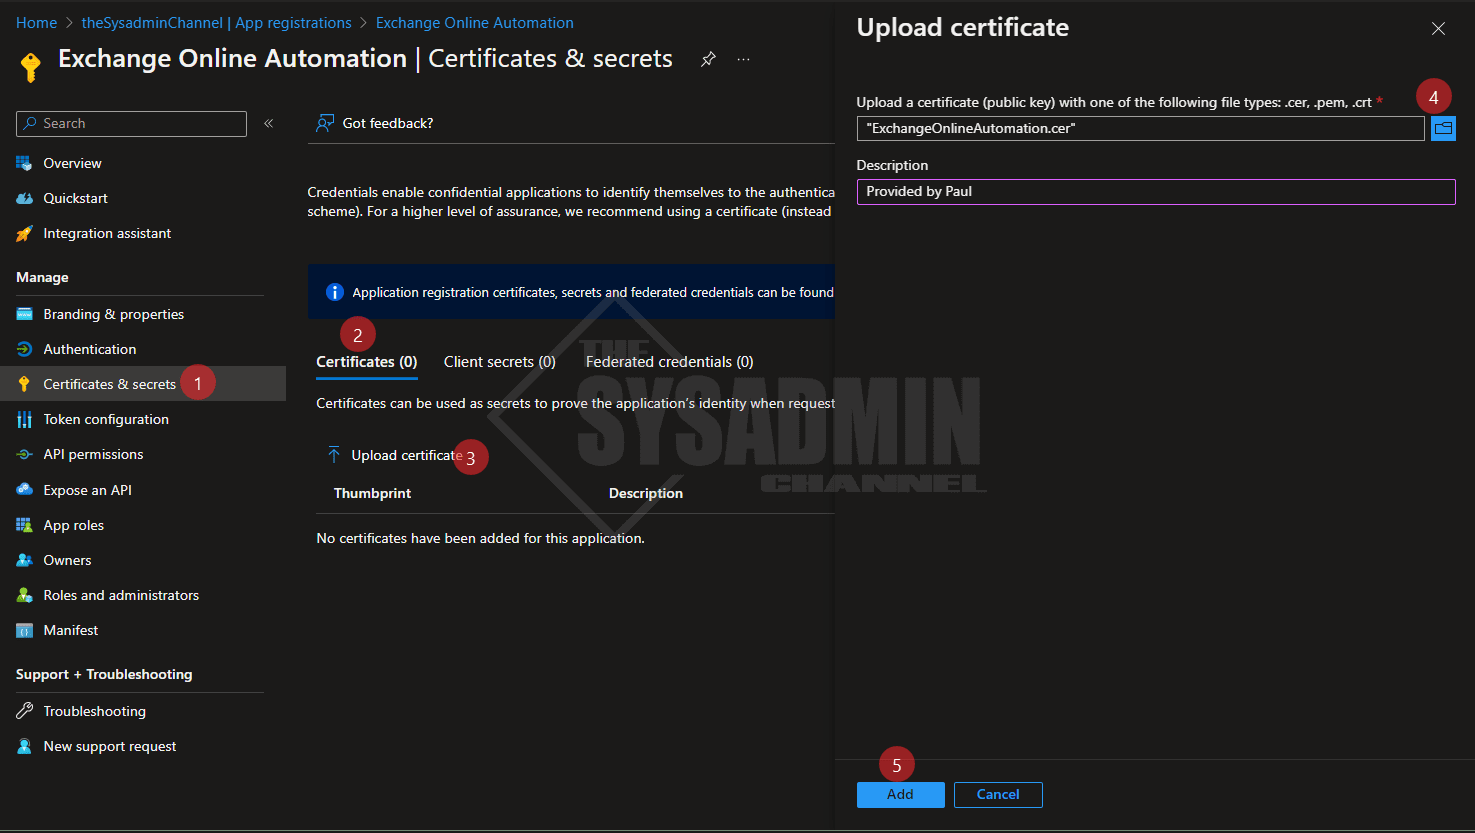
With your app now created:
- Navigate to Certificates & secrets
- Click the certificates tab
- Click Upload certificate
- Click the folder icon and browse to your desktop to select the exported cert
- Click Add

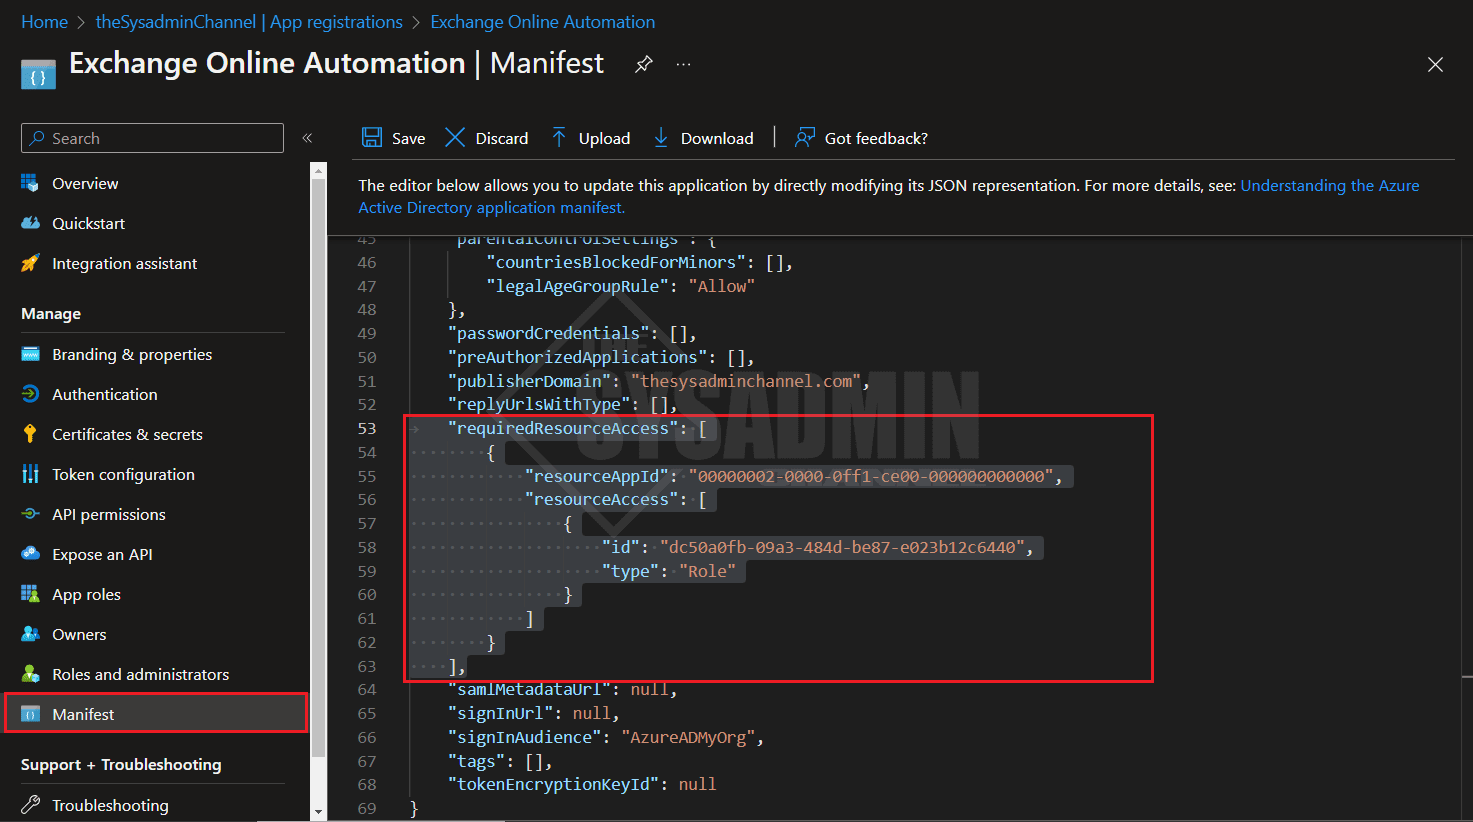
Next we need to add the Exchange.ManageAsApp API permissions within the app so the application object can access the resource. To do this we need to add it through the manifest because we won’t be able to find it via the typical API permissions blade.
Within the app, navigate to the manifest blade and replace the requiredResourceAccess block with this code. Be sure to click save when it’s added.
"requiredResourceAccess": [
   {
      "resourceAppId": "00000002-0000-0ff1-ce00-000000000000",
      "resourceAccess": [
         {
            "id": "dc50a0fb-09a3-484d-be87-e023b12c6440",
            "type": "Role"
         }
      ]
   }
],
Once that is saved, we can verify it was added correctly by going back to API permissions. We will now see that Exchange.ManageAsApp is the only entry there.
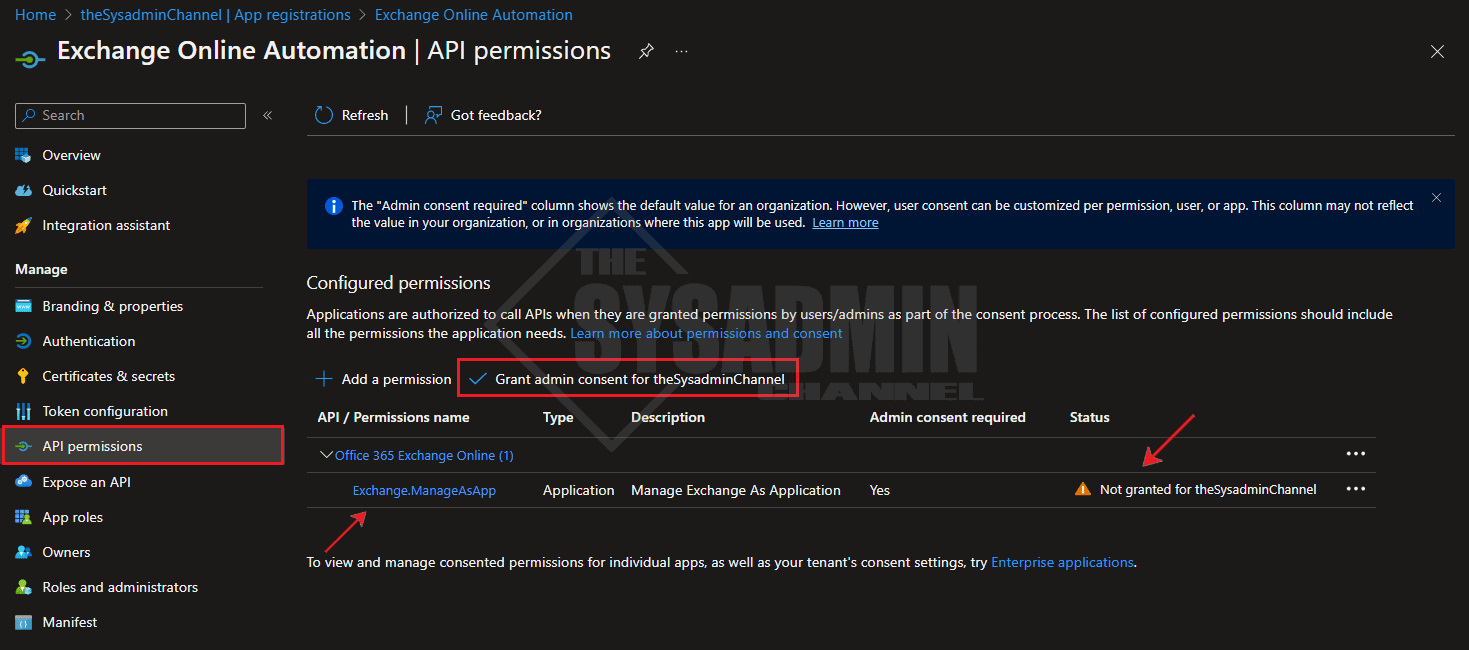
However, we will notice that the app requires admin consent in order for it to be effective. Go ahead and consent to it now. Once complete, it should look like the image below.

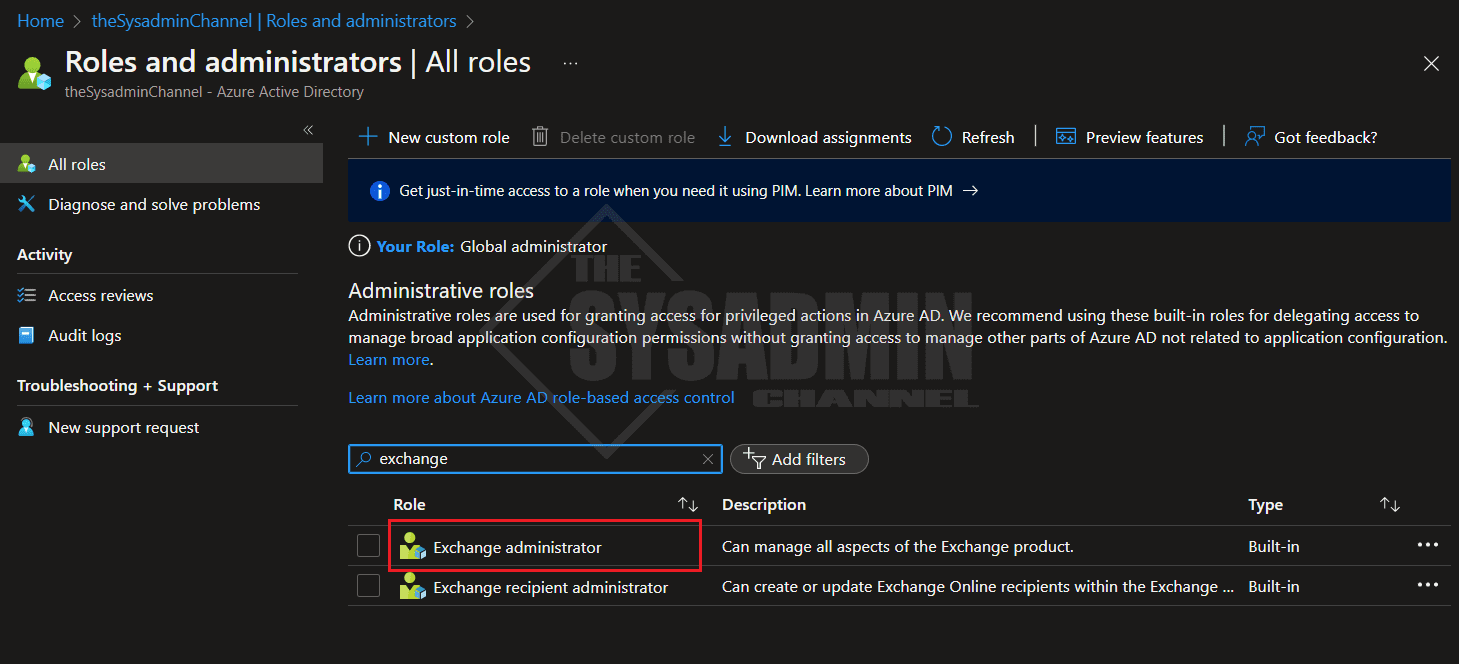
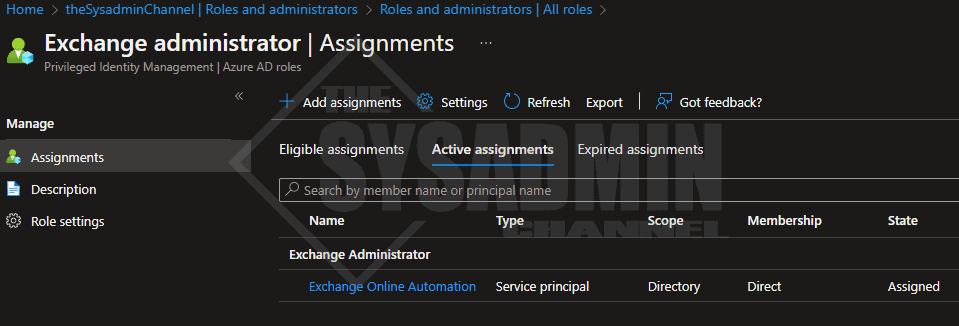
Add Exchange Administrator Role
With our app now created and configured properly, we’ll need to grant the Exchange Administrator role to that app.
Within Azure AD:
- Navigate to Roles and administrators
- Search for Exchange and click on Exchange administrator
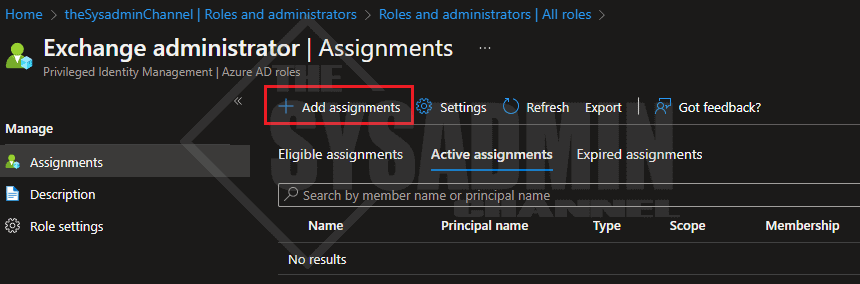
- You should be taken to the active assignments for the Exchange admin role
- Click on Add assignments
- Click no members selected link
- Search for the app name (Our is Exchange Online Automation)
- Click on the app to add it to the selection
- Click select
- Complete the prompts to add the role
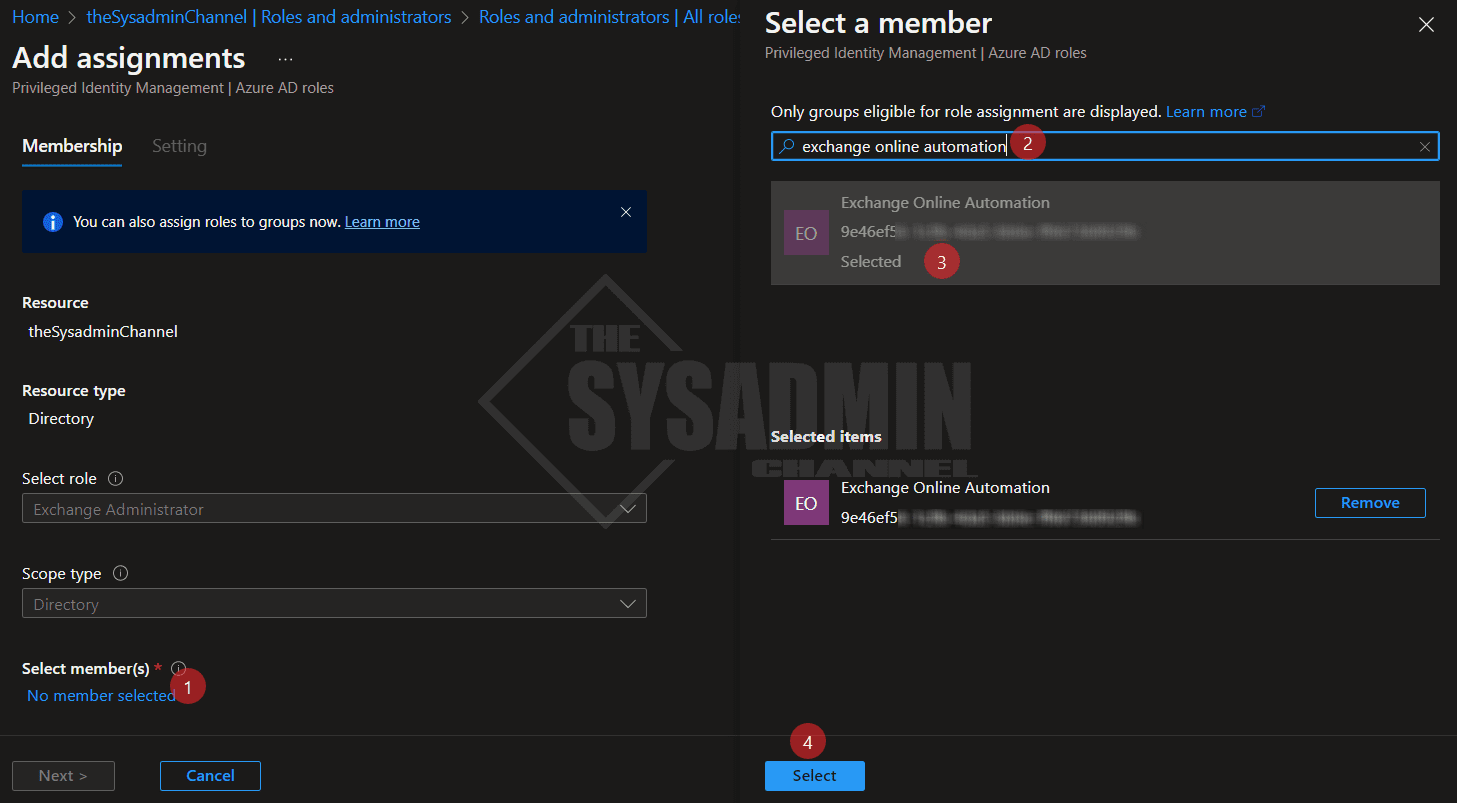
We should now see our Service Principal listed as an active assignment.
Connect to Exchange Online using the Azure Application
Finally, we’re in a spot where we can put all of the pieces together and connect to Exchange Online using our Azure AD application (Service Principal). Again, since I use PowerShell to manage EXO, we’re going to connect using the Exchange Online Management module. Be sure to use the latest version.
Before we connect, let’s get the AppId. We’ll also need to know the tenant’s default onmicrosoft name. To get the AppId, go back to the overview page of the Application we created earlier.
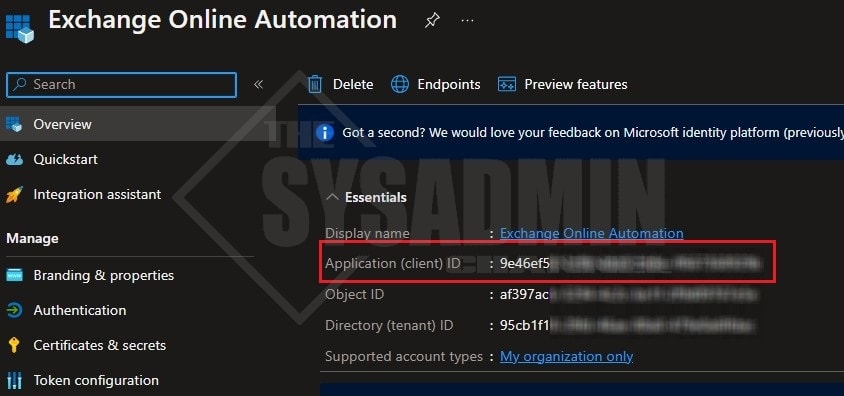
$AppId = '9e46ef5x-xxxx-xxxx-xxxx-xxxxxxxxxxxx'
$Certificate = Get-ChildItem Cert:\CurrentUser\My\A94FFE108DCxxxxxxxxxxxxxxxxxxxxxxxxxxxxx
$TenantName = 'thesysadminchannel.onmicrosoft.com'

Connect-ExchangeOnline -AppId $AppId -Certificate $Certificate -Organization $TenantName -ShowBanner: $false
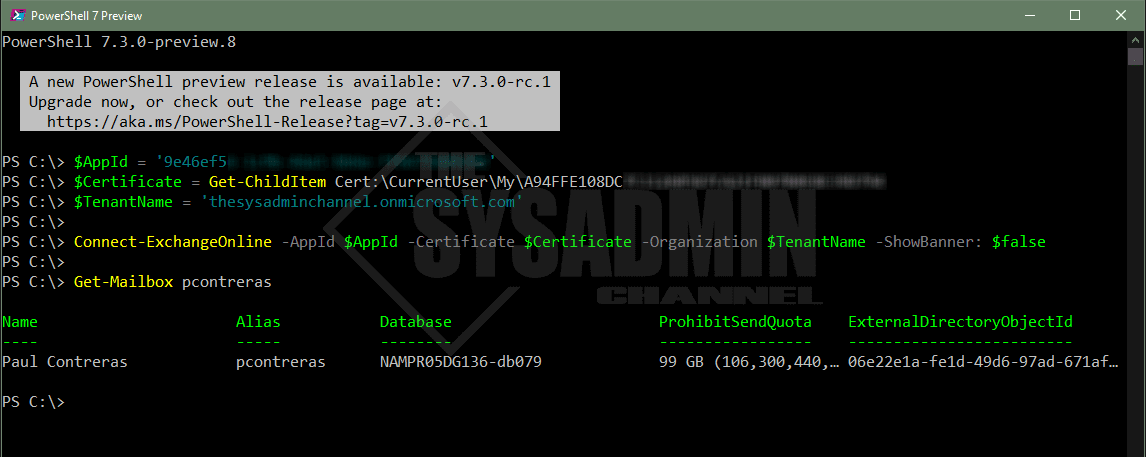
As you can see, we were able to successfully connect to Exchange Online and run the Get-Mailbox command against my account. As a side note, I’ve also chosen to not display the banner by using the ShowBanner: $false parameter in the command.
Conclusion
Hopefully this article on how to use Exchange Online certificate based authentication was insightful and you were able to implement it in your own organization. This is used pretty much daily to automate tasks in Exchange and it’s great that we don’t have to worry about usernames and passwords.
If you want more information on creating Azure apps and using Graph API, check out my in-depth article on how to Connect To Microsoft Graph API Using PowerShell.
Does the CBA have any throttling issues? Earlier when we used username and password for Connect-Exchange to Get-Mailbox details for a lot of users in a loop we saw some throttling issues. Hence we had to split the users and use a different service account for each subset of users.