Anytime I’m writing a new Powershell script I always find my self scratching my head trying to recall the exact syntax inside the parameter block. Even though I’ve created hundreds of scripts in my day, I always use a template because its much easier. Today I’m going to share with the exact Powershell template I use when creating my Powershell Scripts.
The format I use is pretty straight forward. More often then not, I use a parameter that allows a string array for input. This can be achieved by using the type [string[]] with double square brackets. The double brackets means that the input accepts multiple string values. A parameter that only allows a single value would look like this: [string]

Table Of Contents
Powershell Template
I’m going to post the basic Powershell template here and we’ll go over other options in detail so you can use it to your hearts content.
Function Get-Something {
<#
.SYNOPSIS
    This is a basic overview of what the script is used for..


.NOTES
    Name: Get-Something
    Author: theSysadminChannel
    Version: 1.0
    DateCreated: 2020-Dec-10


.EXAMPLE
    Get-Something -UserPrincipalName "[email protected]"


.LINK
    https://thesysadminchannel.com/powershell-template -
#>

    [CmdletBinding()]
    param(
        [Parameter(
            Mandatory = $false,
            ValueFromPipeline = $true,
            ValueFromPipelineByPropertyName = $true,
            Position = 0
            )]
        [string[]]  $UserPrincipalName
    )

    BEGIN {}

    PROCESS {}

    END {}
}
Powershell Advanced Function Explained in Depth
Here I’m going to explain how to write a Powershell advanced function and essentially how to parameter-ize your scripts. This way you can share the script without people having to open and edit the file (and possibly breaking it).
Below is the start of our basic function. After the word “Function” is the name of our function that we’ll call to run the script.
    Function Get-Something {

    }
One thing to mention here is that we should always strive to have one function per purpose. Also, best practice is to use a verb-noun naming convention. Powershell has an approved verb list which can be found by using the Get-Verb cmdlet.
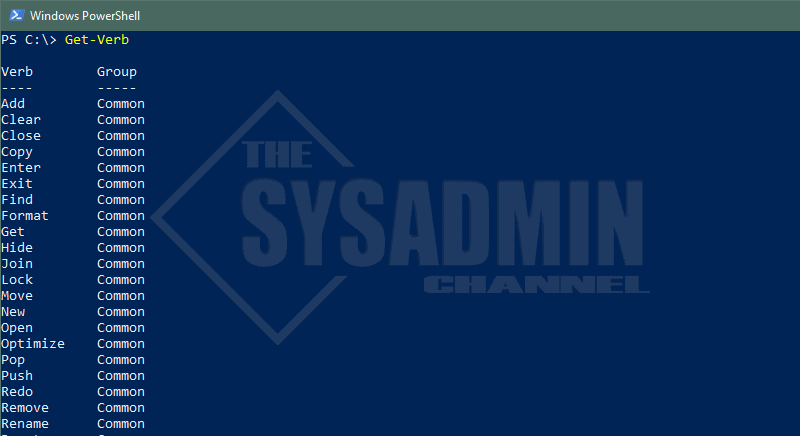
The most commonly used verbs are Get and Set.
Comment Based Help
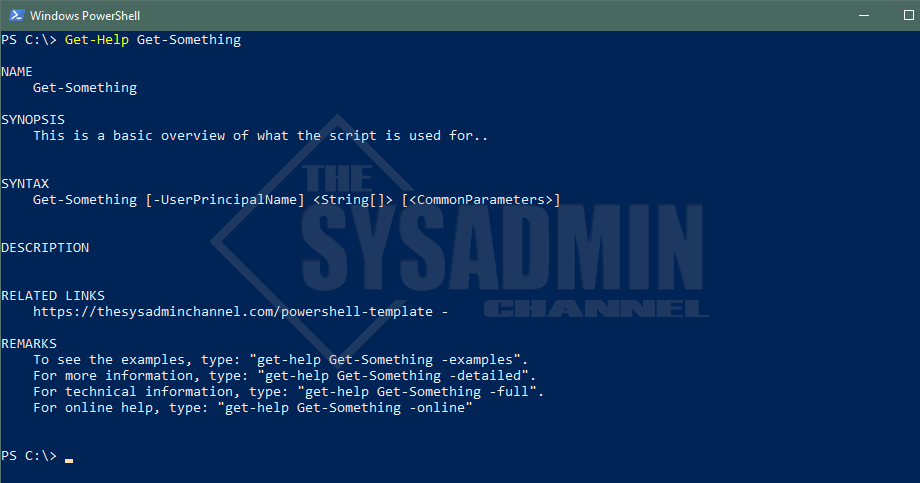
When I write my function I always have the SYNOPSIS, NOTES, LINK and sometimes even an example of how its supposed to be ran. This block of code is used for comment based help and can be called by using the Get-Help cmdlet.
You’ll need to take note of the opening and closing tags. The <# and the #> is used as a multi-line comment and is perfect for this use case. Below is a snippet of my usual comment based help.
<#
.SYNOPSIS
    This is a basic overview of what the script is used for..


.NOTES
    Name: Get-Something
    Author: theSysadminChannel
    Version: 1.0
    DateCreated: 2020-Dec-10


.EXAMPLE
    Get-Something -UserPrincipalName "[email protected]"


.LINK
    https://thesysadminchannel.com/powershell-template -
#>
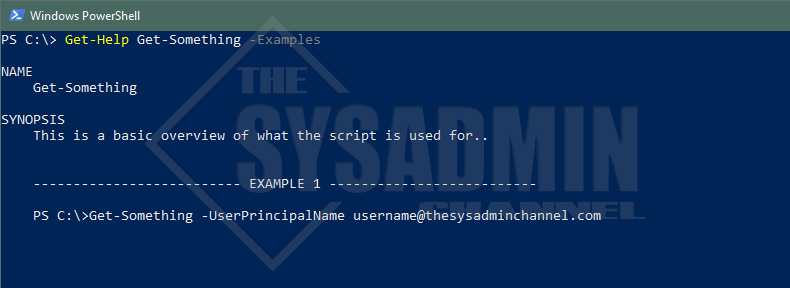
If the function has examples in the comment based help section, which most published functions should be doing, we could view those using the -Examples parameter.
CmdletBinding and the Param Block
    [CmdletBinding()]
    param(
        #Parameters go here
    )
Anytime you use the [CmdletBinding] attribute you’re actually creating an advanced function in Powershell. Pretty cool huh. By adding this little snippet of code, you’re giving your function access to use Powershell common parameters. I’m going to list out the ones per the documentation.
- Debug
- ErrorAction
- ErrorVariable
- InformationAction
- InformationVariable
- OutVariable
- OutBuffer
- PipelineVariable
- Verbose
- WarningAction
- WarningVariable
SupportsShouldProcess
Within the cmdletbinding attribute we have the ability to add a SupportsShouldProcess attribute to allow us to call the -Whatif and -Confirm parameters. This is mostly used if you want to change the state of the command (Set, Remove etc..) so it shouldn’t always be used by default. I wrote another detailed article about the difference between ShouldContinue and ShouldProcess. I would suggest you take a look when you get a chance.
If not, a basic TL;DR is:
- ShouldContinue: Used to prompt the user by default
- ShouldProcess: Does NOT prompt by default
Create Powershell Function Parameters
Arguably one of the most important items to take away from all of this is the ability to create Powershell function parameters as you see fit. As mentioned earlier, I usually setup my scripts to allow for multiple inputs and always try to replicate what the Powershell community is used to using. This is why I have it as a default in my Powershell Template.
An excellent example of this is the ComputerName parameter. Microsoft uses this whenever it wants to identify a machine so if you’re writing a script, you should be using this too. This is the unofficial official parameter that’s widely used so don’t use System or Ip etc.. Try to keep it relevant to what the community is already used to using. If you’re stuck on using other parameter names, we’ll talk about using Alias’ further down the article.
There’s so much information to convey here so let’s start off with a basic snippet of what this looks like in its basic form.
    [Parameter(
        Mandatory = $false,
        ValueFromPipeline = $true,
        ValueFromPipelineByPropertyName = $true,
        Position = 0
        )]
    [string[]]  $UserPrincipalName = "[email protected]"
The position and mandatory attributes are pretty self explanatory. Mandatory tells Powershell that we must have a value added using the function. If you have a default value like my example above, Powershell will still ask you for a value so its best to set it to false if you plan on using a default value. Position is used so you don’t have to use the parameter when calling the function. An example would be:
Get-Something '[email protected]'
ValueFromPipeline and ValueFromPipelineByParameterName are attributes that are used to determine if you want to allow values to be used as input in the pipeline. An example of this would be:
Get-ADUser username | Get-Something
Since the Get-ADUser and Get-Something cmdlets both use UserPrincipalName, we can pass the output from Get-ADUser into the input of Get-Something. This scenario is specifically referring to ValueFromPipelineByPropertyName. Alternatively, if they don’t match exactly, we can use the ValueFromPipeline to still use the pipeline. I use this technique for most of my scripts because I want to try to make things as adaptable as I can. It should mention that I use caution and try to make it happen where it makes sense.
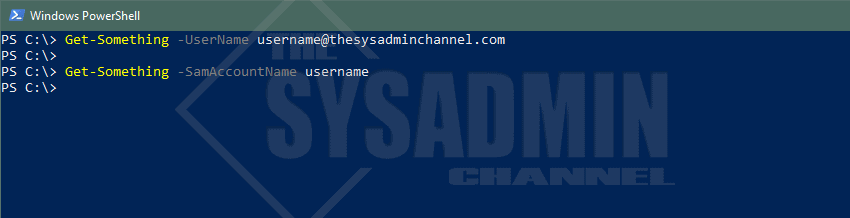
How To Use Alias
I mentioned above that we should always strive to use community standards. In an example earlier I referenced using ComputerName. However, what if we wanted to have something else show up as a parameter and tie it into the function. In that case, we would use an Alias. Let’s see what this looks like in our sample function Get-Something.
    [Parameter(
        Mandatory = $false
    )]
    [Alias("UserName", "SamAccountName")]
    [string[]]  $UserPrincipalName
How To Use ValidateSet and ValidateRange
An attribute that comes in the clutch when you want a specific range or want a predetermined set is the ValidateRange or ValidateSet.
Let’s say you have a script that uses numbers and you only want to allow numbers between 1 through 100. Instead of writing an if statement to say if $num -gt 100.. do fail blah blah, you can use ValidateRange to automatically tie that in there and have Powershell work the logic for you. Let’s see what that looks like in our Get-Something script.
    [Parameter(
        Mandatory = $false
    )]
    [ValidateRange(1,100)]
    [int]  $MaxResults

Here we can take note of the ValidateRange attribute and the MaxResults data type. Since we’re dealing with numbers, or an integer data type, we set our MaxResults variable data type to [int]. Furthermore, in our screenshot we entered a number greater then the allowed top range and it errored automatically.
Almost the same can be said for the ValidateSet attribute. However instead of integers, we use preset values for our strings. This way the person running the script only has a limited amount of strings they can pass into the function. Another great take away from using ValidateSet is that the user can tab complete the options that are available to them so it makes for a better user experience. Let’s see what it looks like in the code block.
    [Parameter(
        Mandatory = $false
    )]
    [ValidateSet('[email protected]', '[email protected]')]
    [string[]]  $UserPrincipalName
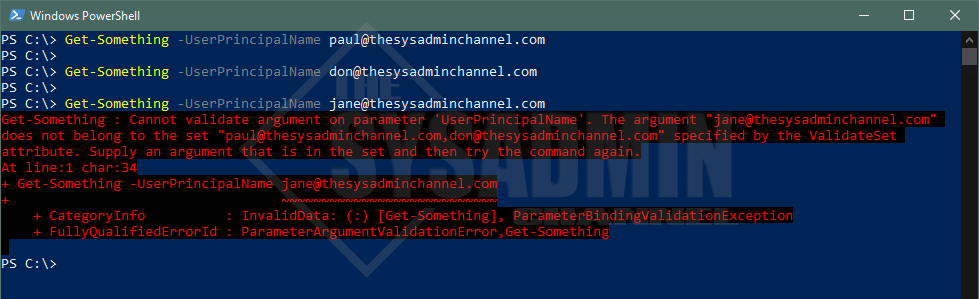
In our script here we can only use the values ‘[email protected]‘ and ‘[email protected].’ Had I put some logic in there, the script would have went through its flow and continued on.
However, when I use a non permitted value such as ‘[email protected]‘ we can see that there is an error saying Cannot validate argument on parameter ‘UserPrincipalName’.
How To Use ValidateScript
Definitely one of the trickiest, yet most flexible attributes of the bunch is the use of ValidateScript. This will allow you to script out a validation to see if it works with your logic. A real world example of this would be checking if a user exists in AD before continuing on with the function. Let’s see what the code looks like.
[Parameter(
    Mandatory = $false
)]
[ValidateScript( {Get-ADUser -Filter "UserPrincipalName -eq '$_'" | select -ExpandProperty UserPrincipalName} )]
[string[]]  $UserPrincipalName
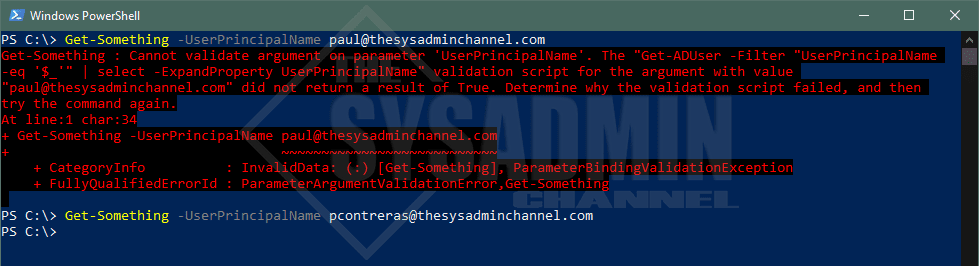
The key take away here is that your parameter input must match the validation script’s output. In my ValidateScript example above, I don’t have a user with the UPN [email protected] so it threw an error. However, when I used [email protected] which is a user in my lab, it worked.
Another item to mention is the $_ in your validation script is going to be pulled from the parameter input. It’s similar to how you would use a Foreach-Object or Where-Object in the pipeline.
How To Use ParameterSetName
The ParameterSetName attribute is useful when you want to have 2 or more parameters, but don’t want them to run simultaneously. Think of it as a “this or that” parameter. An example of this would be if you wanted to add a parameter to include an object, but also wanted to add a parameter to exclude similar objects. This is an arbitrary example but hopefully you get the idea. Let’s look at what the sample code snippet would look like.
[CmdletBinding(DefaultParameterSetName="Default")]
param(
    [Parameter(
        Mandatory = $true
    )]
    [string[]]  $UserPrincipalName,

    [Parameter(
        Mandatory = $false,
        ParameterSetName = 'AnyName_A'
    )]
    [switch]    $Include,

    [Parameter(
        Mandatory = $false,
        ParameterSetName = 'AnyName_B'
    )]
    [switch]    $Exclude
)
The focus here is that we can choose which parameters we don’t want to run together and which ones we do. Alternatively, if a parameter doesn’t belong to a parameter set (like UserPrincipalName in our example above), it’s able to be used with all parameters in the param block.
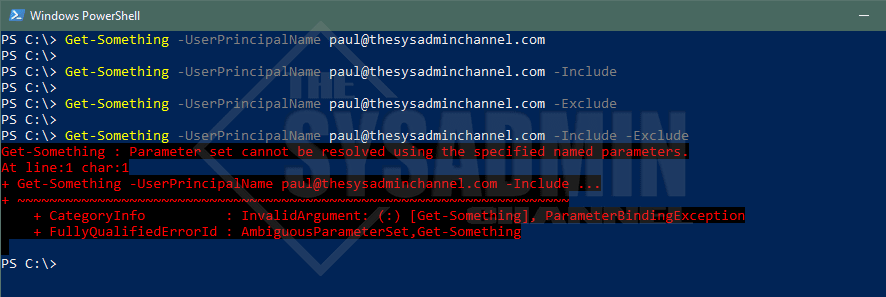
-Include and -Exclude work independently of each other, but not simultaneously.
Another take away here is that the CmdletBinding attribute also has a default parameter set name. This allows the function to run when A or B is not specified. So in our case, we want to run the UserPrincipalName parameter but don’t need to run the Include or Exclude parameter if we don’t want to.
Powershell Begin, Process and End Blocks
While this is not technically required to have in your functions, I always like to explicitly put it in there because it gives it a cleaner look. In my opinion it gives it a better structure.
Omitting the begin and end block will automatically have the code run under the process block. However, I like to give my code some structure so I’ve drilled it into my head to have it in every script. Furthermore, this is why I have it set in my Powershell Template.
Begin and End Blocks
If you take a step back, the begin and end block don’t need to be complicated at all. After all, everything you run in here can be ran inside the process block, but the question is… When, why and what for that matter should you use this for.
An important thing to keep in mind is that the code inside the begin and end block will only run once. With that being said, I like to use the begin block whenever I am making or validating a connection to an endpoint. Whether it be a SQL database or Azure AD, there are ways to tell if you’re already connected or if you need to connect. If it’s not connected, I usually throw in an -ErrorAction Stop so the code doesn’t run past that point.
The end block is pretty much the opposite. I’ll usually close whatever connection I need or run some kind of output. In all honesty though, 9 times out of 10 I leave the end block empty.
Process Block
The meat and potatoes of the Powershell function is the Process block. This is where the majority of your code will run so it’s important to mention that the code inside the process block will iterate over the objects. If you have objects coming in the pipeline or if you run a foreach loop, the code gets ran here. In the case of our Powershell template, I went ahead left it empty since we’ll be writing this from scratch.
Hopefully this complete guide to create a function using our Powershell template was able to help you understand how this works. If you want some more real world examples, be sure to check out our Powershell Gallery. It’s full of actual scripts that you can use in your organization.
Finally, don’t forget to check out our Youtube Page for sysadmin video content.
This is great. I’m going to get started on my first function today. I’d like to just start with some that that is super repetitive, like adding a user to a certain group then have it email the users using smtp relay ([email protected])