We all know it is best practice to enable Multi-Factor Authentication for your user base. However, as we may come to find out, not all MFA methods are created equal. Some methods rely on username and password (weak sauce), while others rely on physical devices such as Fido 2 and Windows Hello for Business. Today we’re going to show you how to enable Authentication Strengths in Azure AD using Conditional Access Policies.
Table Of Contents
- What is Authentication Strength?
- What types of Authentication Strengths are available?
- Requirements
- Enable Authentication Strengths
- Configure the Conditional Access Policy
- User Experience
- Scenario 1: The user does NOT have the authentication strength registered
- Scenario 2: The user does have the authentication method registered
- Known Limitations
- Conclusion
What is Authentication Strength?
Authentication strength is a Conditional Access control that enables administrators to specify what combination of authentication techniques can be used to access a cloud resource.
The Authentication methods policy, which allows administrators to specify the authentication methods to be used across Azure AD applications, forms the basis for authentication strength. Authentication strength enables further control over the application which can depend heavily on variables like access to sensitive resources, user risk, location, and more.
With this policy enabled, you can require access to high profile applications using ONLY MFA resistant methods like Windows Hello for Business or Fido 2. For all other applications or resources, you can set a policy to enable any one of the Passwordless methods available to you as an Azure AD user. With that said, let’s touch on the different authentication strength types and how they’ll be useful to your organization.
What types of Authentication Strengths are available?
When requiring MFA, it’s important to know that some methods are better than others. If your resource is located in Azure, there are several authentication strengths available to you with little configuration on your end. It’s all built-in to the product which is great.
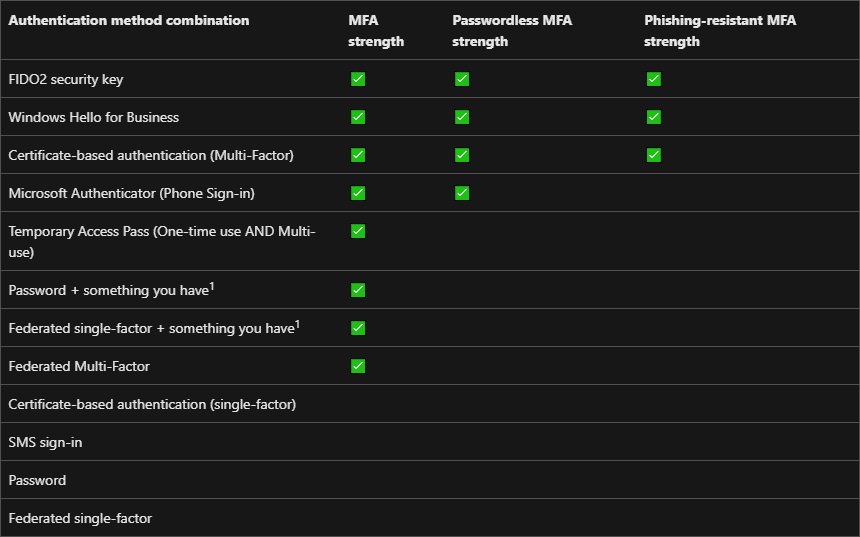
Regarding the actual types, there are 3 main buckets
- Password + MFA (Good)
- Passwordless MFA (Better)
- Phishing Resistant MFA (Best)
Here is a table provided by Microsoft that outlines all of the possible types and what bucket they fall into.
Requirements
In order to enable authentication strengths, we need check a few boxes to make that happen. Let’s cover the requirements needed to ensure you’re on a road to success.
- Azure AD P1/P2 License
- Authentication Policy Administrator or Global Administrator
- Authentication Methods Policy configured
- Enable combined registration
Enable Authentication Strengths
By default Microsoft gives us 3 types of authentication strength policies right out of the box so we can hit the ground running.
Those built-in policies are:
- Multi-factor authentication
- Passwordless MFA
- Phishing-resistant MFA
It’s pretty neat that the 3 built in policies are exactly the same as the three buckets we mentioned above. That’s great but what if we wanted to create a custom authentication strength to only allow a specific requirement for a specific Azure resource? Let’s look at creating a custom authentication strength policy.
Within Azure AD:
- Navigate to Security → Authentication Methods → Authentication Strengths
- Direct Link: https://portal.azure.com/#view/Microsoft_AAD_IAM/AuthenticationMethodsMenuBlade/~/AuthStrengths
- Click on New Authentication Strength
- Enter in Name and Description
- With the chevrons expanded, select the specific authentication strength you’re looking to add
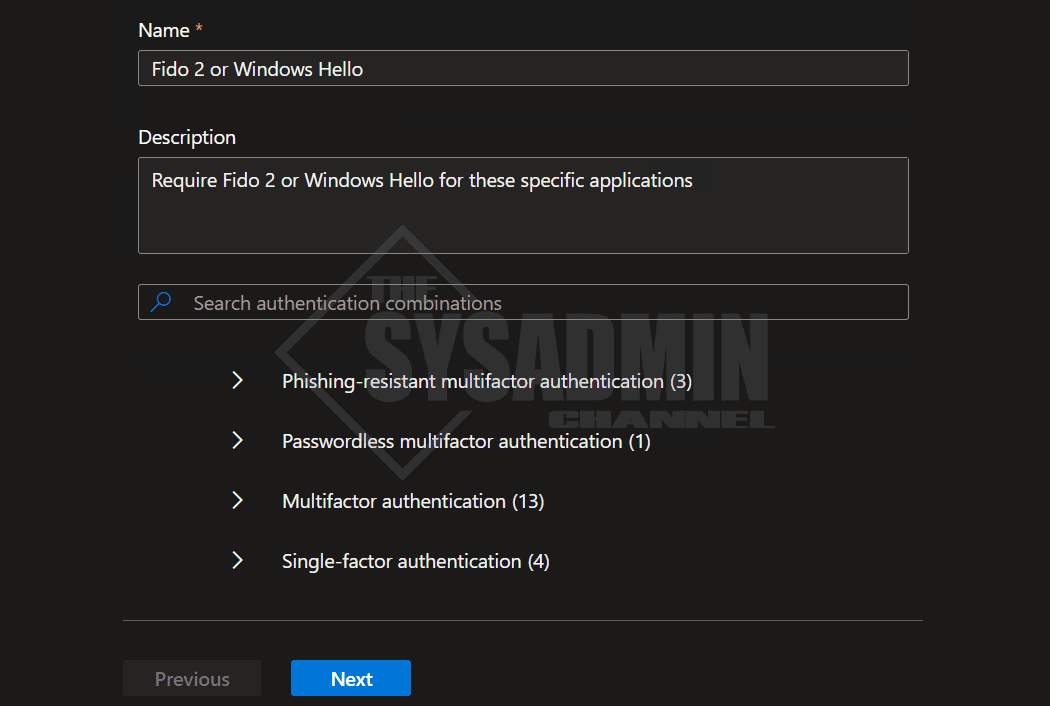
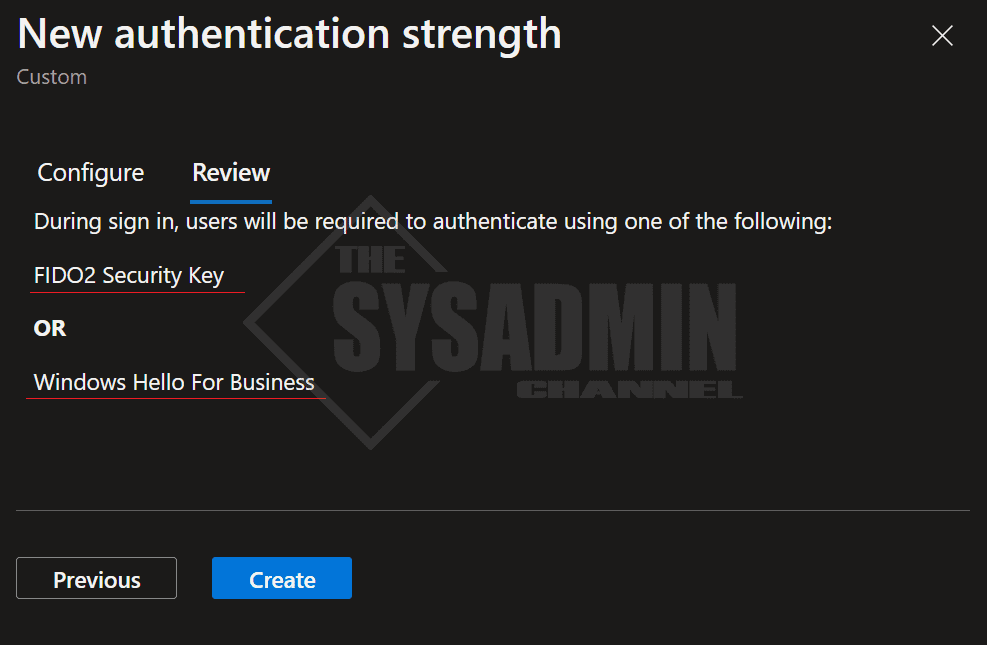
- Follow the prompts to create the policy
- My custom policy will only allow Windows Hello or Fido 2 to be used
Once I hit create, we can see that my policy is created. However, you’ll notice that it is showing “Not configured in any policy yet” under the conditional access policies column.
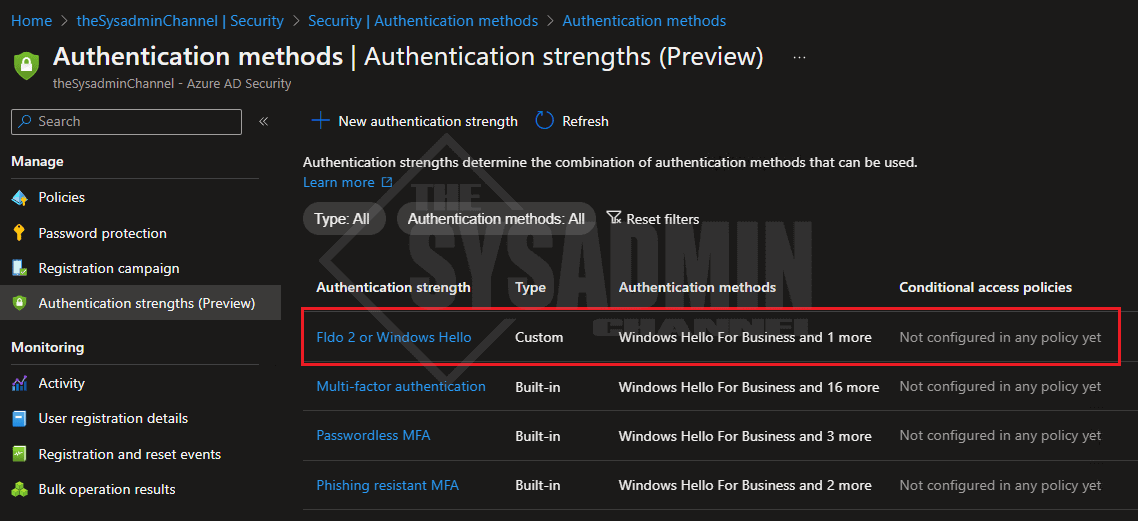
Let’s move forward to see how we can configure the conditional access policy.
Configure the Conditional Access Policy
Now that we have our custom authentication strength created, let’s look at how to apply that for a specific set of users and/or applications. Conditional access policies can have a wide variety of controls you want to put in place, however, for this article we’ll apply it to a user on a specific app.
Within Azure AD:
- Navigate to Security → Conditional Access → Create a new policy
- Give the policy a relevant name
- Under Users: select the users/groups you want in scope of this policy
- Under Cloud apps: select the apps you want in scope of this policy
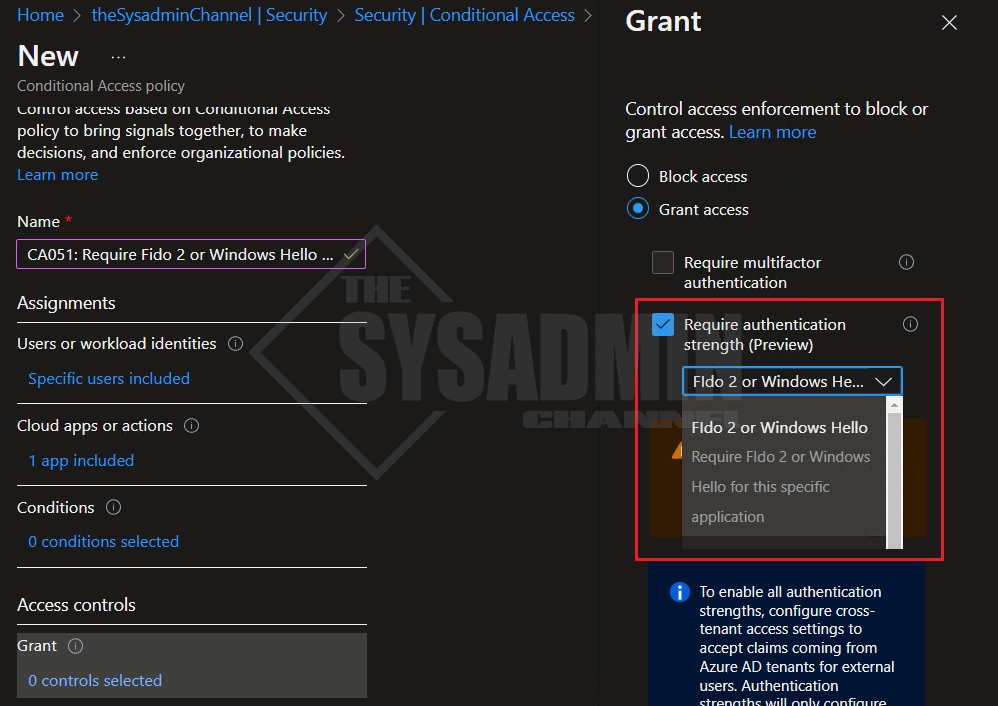
- Under Grant:
- Ensure the Grant access radio button is selected
- Select Require authentication strength checkbox
- Select the authentication strength you just created (Ours will be Fido 2 or Windows Hello)
- Select require all the selected controls
- Leave the policy in report only mode until you’re ready to enable it
User Experience
From a user’s perspective, there are 2 scenarios we need to keep in mind when enforcing an authentication strength through a conditional access policy.
- Scenario 1: The user does NOT have the authentication strength registered
- Scenario 2: The user does have the authentication method registered
Let’s drill down and cover both scenarios so you know exactly what to expect for each. The second scenario is the end goal so we’ll start with users who have not registered the required authentication strength first.
The user does NOT have the authentication strength registered
If a user is in scope of a policy that requires an authentication strength and they have not registered it, what does that look like?
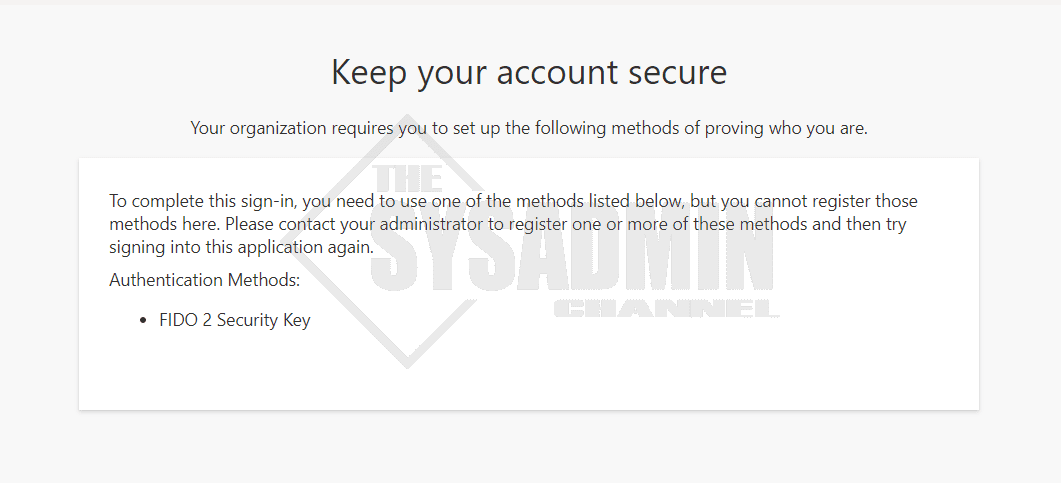
My new authentication strength CA policy was only scoped to a single user going to Office 365. This user does not have Fido 2 or Windows Hello registered on their account so here’s what that looks like when I hit that endpoint.
First, I am prompted to authenticate using my normal method, then I get a notice saying the following.
Keep your account secure
Your organization requires you to set up the following methods of proving who you are.
To complete this sign-in, you need to use one of the methods listed below, but you cannot register those methods here. Please contact your administrator to register one or more of these methods and then try signing into this application again.
Authentication Methods:
Your Required Authentication
From here, the user will need to navigate to https://aka.ms/mysecurityinfo, follow the prompts and add the required method. You can reference this MS Doc to register a Fido 2 Security Key.
The user does have the authentication method registered
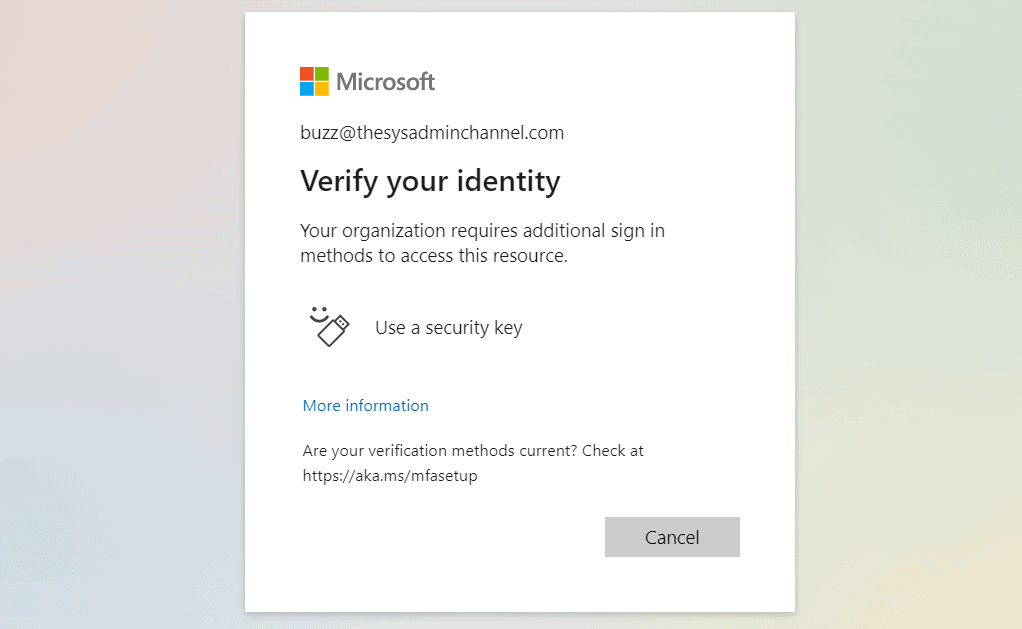
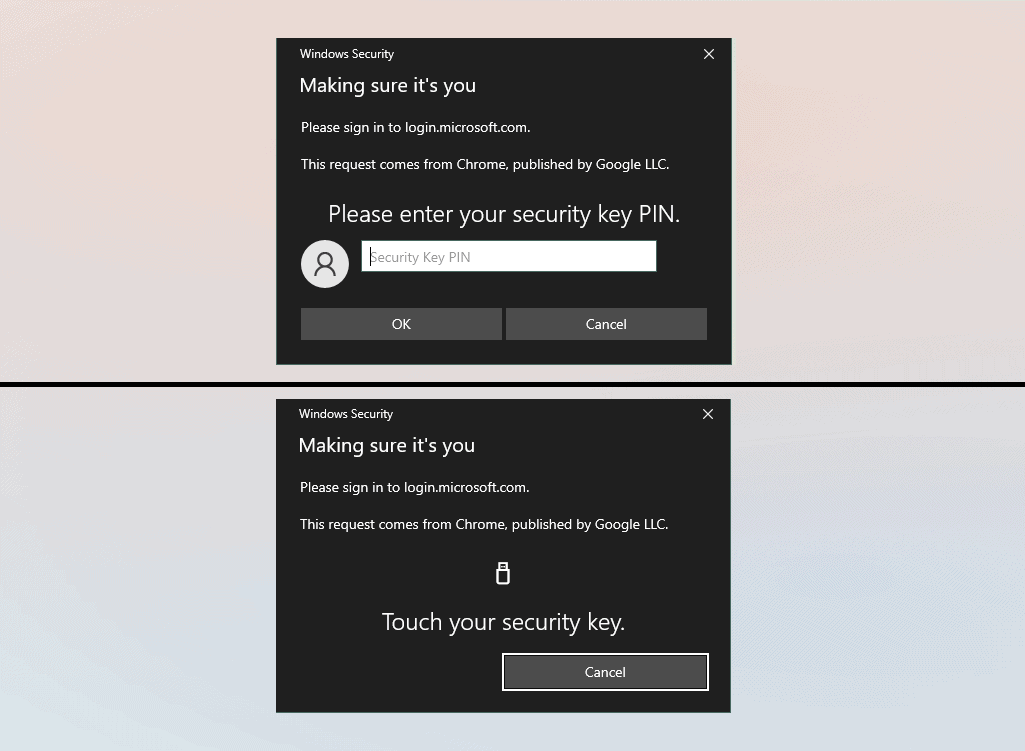
Moving on to the second scenario. If a user is already registered for their required auth strength, let’s take a peek of what that will look like from a user’s perspective.
If you’re signing in to a new session, you will need to successfully authenticate using the most recent authentication method used. Azure will then determine if the conditions of the policy apply and if it does, you’ll be prompted to verify the identity using the required auth strength. In my case, I’m required to use Fido 2.
Known Limitations
Before we go all gung ho and start enforcing everything using specific authentication strengths, it is important to know the limitations and how it can impact your users. If you’re running a predominantly Windows environment, there’s a much better chance you’ll have success because there are more things that are vertically integrated.
However, this is not the case for environments that have a mix of MacOS, Linux and Windows. Obviously since Windows Hello is a Windows feature, this will not work on other platforms so I guess that goes without saying. We also need to understand that Fido 2 doesn’t work with Safari so MacOS users will need to use Chrome if they need to Fido into any application. I’ve personally run into issues where some applications on MacOS just won’t work when requiring a security key because Apple hasn’t fully integrated this into their product yet.
Another thing to consider is that there are currently issues if you want to enforce Passwordless as a baseline policy. If you apply a policy enforcing Passwordless to a user who currently doesn’t have it enabled, they’ll get an infinite loop. Before you enforce this policy, be sure the users have this enabled so you can save yourself from trouble down the road.
Conclusion
At last we’re at the tail end of this article and hopefully you found it very informative knowing how to enable authentication strengths using Azure AD conditional access policies. This is something that can definitely improve your organizational security as well as add the convenience of Passwordless.
This feature is still in preview so there is still more work needed to iron out the rough edges but at the end of the day, this is still a win for admins who want a stronger security posture across their cloud environment.