Microsoft has confirmed on multiple occasions that the Azure AD Graph Endpoint is deprecated and will be fully decommissioned in the future. This means that if you’re currently using the AzureAD (or AzureADPreview) Module(s) then after it’s deprecated, your scripts will no longer work. In order to avoid any issues, we’re going to go step by step as well as the multiple ways for how to connect to Microsoft Graph API using Powershell.
If you’re interested in learning more about the decommission of Azure AD Graph, here’s a doc from Microsoft. Below is snippet from that article.
June 30, 2023 will mark the end of the three-year deprecation period for Azure AD Graph. Before June 30, 2023, existing applications using Azure AD Graph will not be impacted. After June 30, 2023, Azure AD Graph will enter its retirement phase where we will retire it in incremental steps to allow you sufficient time to migrate your applications to Microsoft Graph APIs
How To Connect To Microsoft Graph API Using PowerShell
This is going to be a pretty in-depth article on how to connect to Microsoft Graph API using PowerShell so hopefully it will give you a pretty good understanding of all the parts and pieces at play.
Feel free to use the table of contents to navigate through the individual topics.
Table Of Contents
- Download Microsoft.Graph Powershell Module
- Overview of Microsoft Graph API Scopes
- Connect to Microsoft Graph API Using Interactive Logon
- Creating an App Registration and Service Principal
- Configure The App To Use Certificate Based Authentication
- Configure The App To Use Client Secret Based Authentication
- Configure API Permissions For The Application
- Configure Application Permissions To Use For Unattended Automation
- Configure Delegated Permissions To Use For Interactive Sessions
- Connect Using A Service Principal and Certificate Based Authentication
- Connect Using A Service Principal and Secret Based Authentication
- Set Microsoft Graph Profile to use v1.0 or Beta Versions
- How To Get Your Current Permission Scope
- Powershell Graph API Examples
- Conclusion
Download Microsoft.Graph Powershell Module
In order to get started with Using Microsoft Graph API in your Powershell session, the first thing we want to do is install the Microsoft.Graph Module. This is more commonly known as the Microsoft Graph Powershell SDK and all the cmdlets in this module start with “Mg”. Another thing that I absolutely love about this module is that it works great with Powershell 7.
In this article I’m going to use PS7 but if you’re using PS5.1, everything is pretty much the same.
Install-Module Microsoft.Graph -Scope AllUsers -Force
Install-Module Microsoft.Graph.Beta -Scope AllUsers -Force
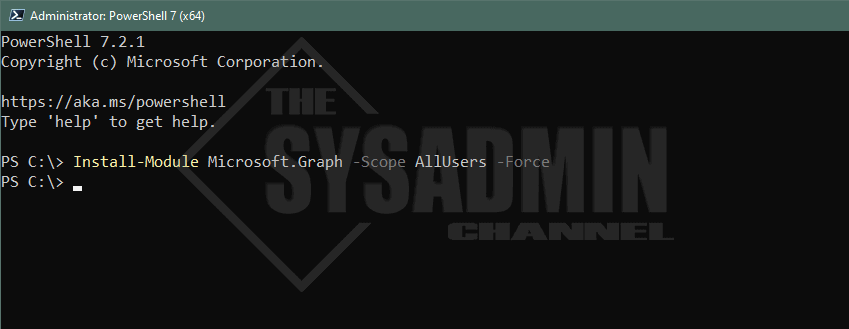
Note: -Scope AllUsers requires admin rights whereas -Scope CurrentUser does not.
Overview of Microsoft Graph API Scopes
One very important topic to understand when dipping your toes into using Microsoft Graph API are Scopes. Understanding Scopes will definitely ease the transition and flatten the learning curve. I’m not going to lie when I first started using it, I ran into many challenges. Especially with documentation! Since this is still relatively new there’s not a ton of articles or examples at the ready.
As with anything, the more you practice and learn, the easier it becomes. With that said, Microsoft Graph API as a whole encompasses all of the APIs that are available in your tenant. However under the hood, there’s an API for users, authentication methods, MS Teams, Azure Key Vault and many more but for simplicity sake it’s all referred to as Graph API.
Just because your account has permissions to a certain role, doesn’t mean it’s automatically granted that scope. Here’s a real world example for you.
Buzz Lightyear has the ‘User Administrator’ Azure AD Role which allows him to manage all aspects of users and groups, including resetting passwords for limited admins. However, if he only connects using the User.Read.All scope then it will not allow him to modify any properties on the account even though the underlying permissions are there.
A simple way to put it. Scopes are permissions for the session, whereas roles are permissions for the account. Hopefully that makes sense.
How To Get The Scope of a Cmdlet
It’s a good idea to only use the scopes that are applicable to the current session to ensure you’re not over-privileged at run-time. But how exactly do we know what scopes are needed for the cmdlets we want to use?
To answer this question, I always turn to Graph Explorer. It’s by far easier for me to quickly check here than read through the documentation. if you prefer the documentation, by all means go ahead but this has typically worked well for me.
Let’s take a look at Graph Explorer to give a better example of what I’m talking about.
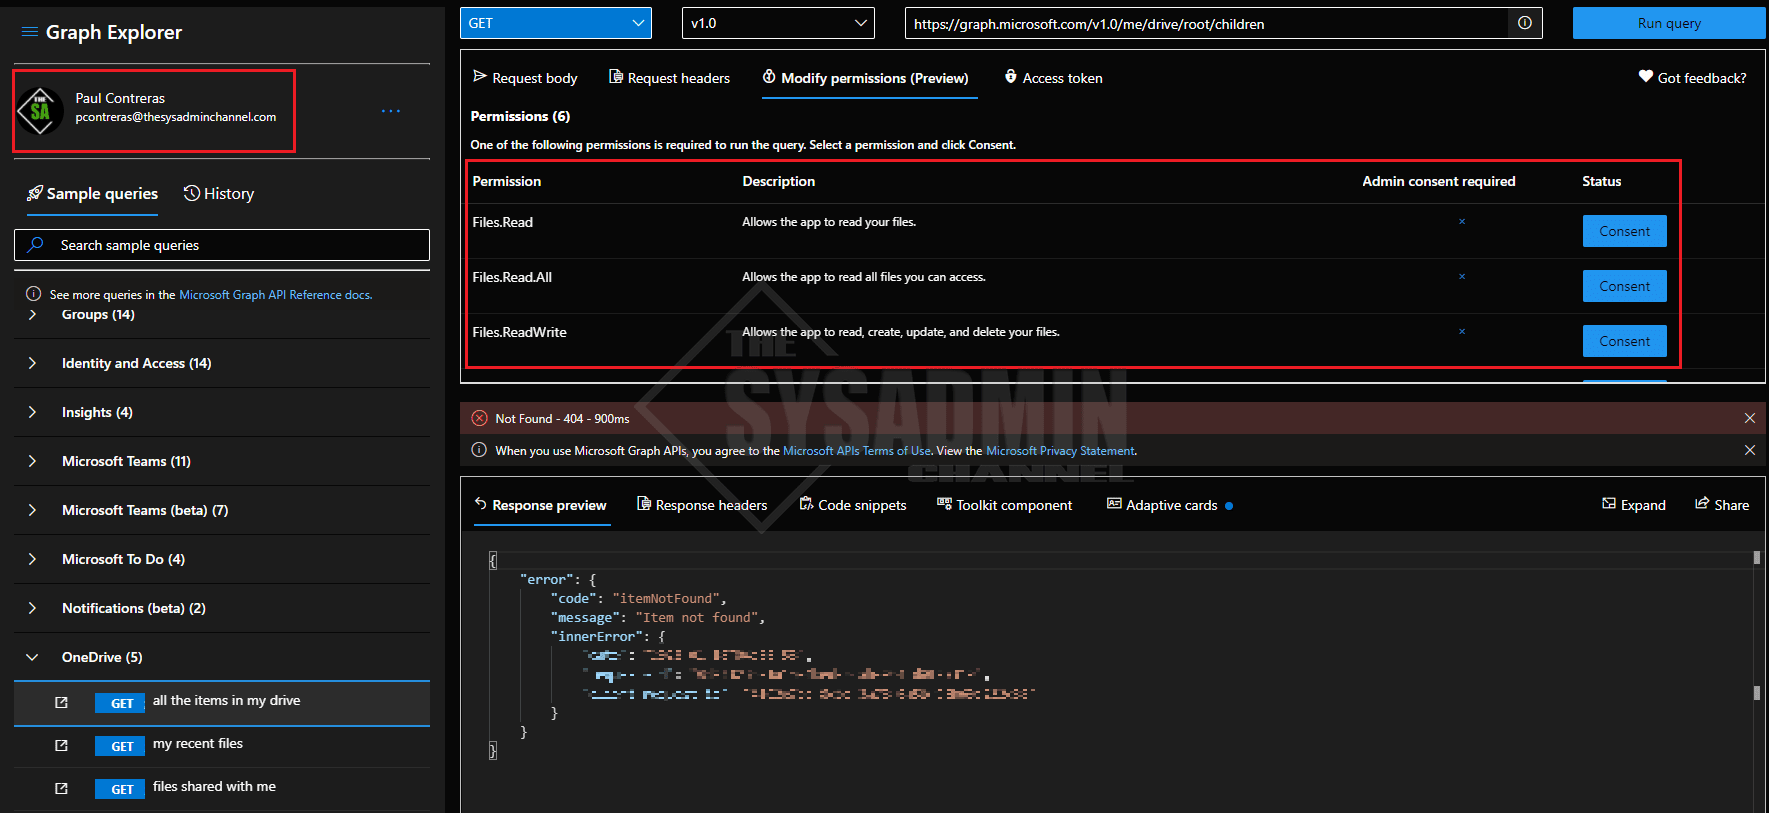
Note: I am signed in as myself to allow queries from Graph Explorer to be ran under my tenant and my actual data. If you’re not signed in, sample data can be used.
In the screenshot above, I ran a sample query to list all of the items in my OneDrive. We can also see on the upper right pane under Permissions what scopes are needed. In this case, I should be good to go with ‘Files.Read.All’ if I plan on using it for reading files outside my own account.
However, one important thing to take note on is the Status column. All permissions require consent in order to run. An administrator can grant consent on behalf of the entire organization if needed, or grant consent to the individual identity. Once consent is granted, you will not need to reconsent on any future sessions since it stays tied to the identity. A lot of layers and restrictions are put in place so I see it as a security win!
How To Get The Scopes From The Current Session
Last but not least, if you’re connected and you want a reminder of what Scopes you’re currently using, you can always use the Get-MgContext cmdlet to display an output.
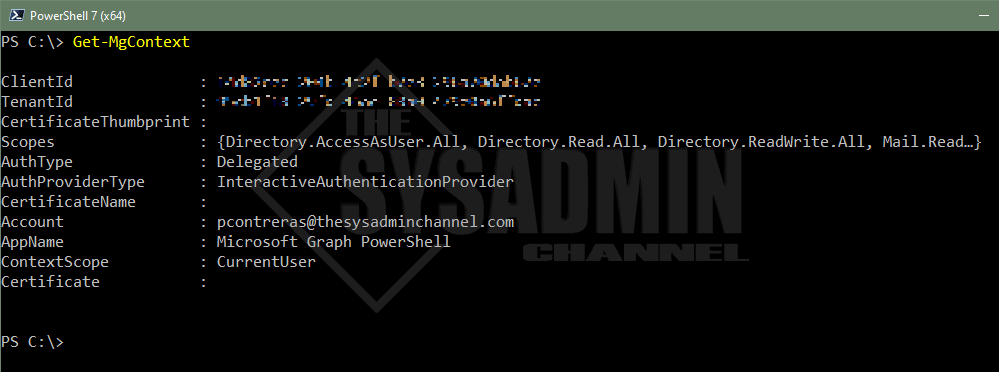
I am signed in under delegated permissions using Interactive Logon.
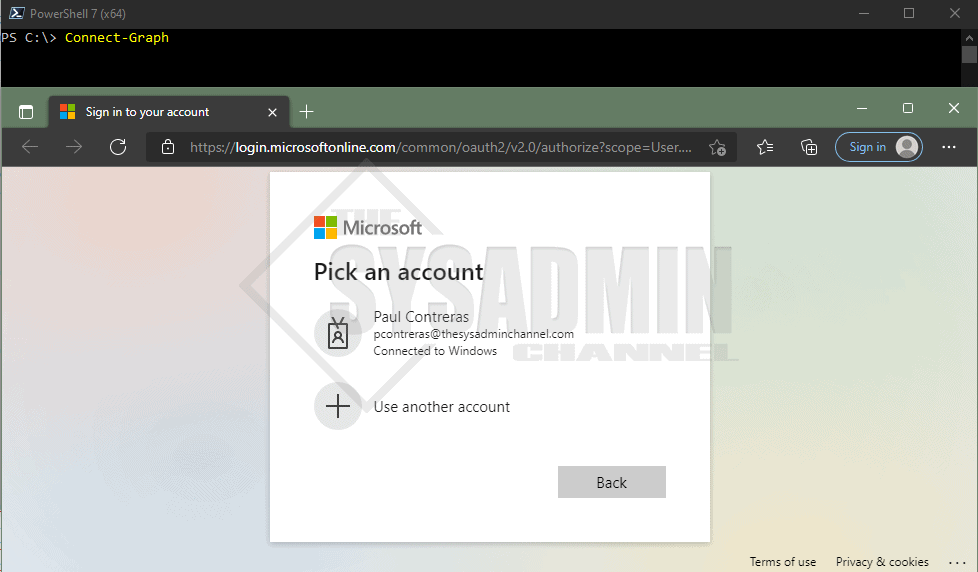
Connect to Microsoft Graph API Using Interactive Logon
The quickest and easiest way to connect to Microsoft Graph API using PowerShell is to use delegated permissions with interactive sign-in. The screenshot above shows the aftermath, however, let’s look at how we can get there.
- Open Powershell where the module was downloaded
- Type Connect-Graph
- Enter in the credentials in the browser that pops up
- You should see authentication complete
Something to note here is that simply calling Connect-Graph (Connect-MgGraph) is using the DEFAULT Graph PowerShell Application. Some folks aren’t comfortable with using that because it has all of the delegated permissions added, however, there is a way to use your own app for a specific purpose. This is useful so we’re not over-permissioning users. The way to do that is to use the AppId (ClientId) and omit the key credentials (certificate or secret)
Connect-Graph -AppId xxxxxxxx-xxxx-xxxx-xxxx-xxxxxxxxxxxx -TenantId xxxxxxxx-xxxx-xxxx-xxxx-xxxxxxxxxxxx
There are some pros and cons with using interactive logon. The biggest drawback in my opinion is that this is in no way usable for automation, albeit, it’s also not intended for automation purposes.
If you’re looking to setup an account for automated use, creating an App Registration and Service Principal is definitely the route to go. Let’s continue along and go through the motions on how to set that up.
Creating an App Registration and Service Principal
As mentioned, using an App Registration along with a Service Principal is definitely the way to go when you want to use it for automation. This has really become my go-to because its quick, easy and removes a lot of the guess work. It’s also great for security but we’ll touch on that a little later.
In short, the Service Principal is what’s actually logging into Azure and the application is setting the API permissions that it’s bound to.
That was kind of a lot to take in, so for now, let’s go through the steps to create an App Registration.
- In your Azure AD Tenant, navigate to AzureAD -> App registrations
- Direct Link: https://portal.azure.com/#blade/Microsoft_AAD_IAM/ActiveDirectoryMenuBlade/RegisteredApps
- Click on New registration
- Enter in the preferred name. I’ll name mine ‘My Automation App‘
- Under supported account types: Choose Single tenant
- Under Redirect URI: choose web and set the URL address to http://localhost
- Click Register

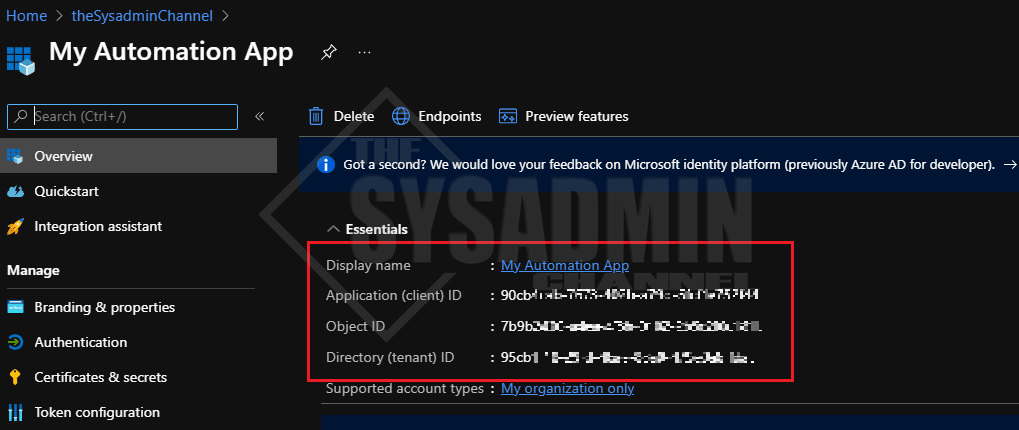
Once that’s complete you should automatically be redirected back to App’s overview page. While you’re there, be sure to jot down the Application (client) Id and the Directory (tenant) ID. You’ll need this later when you’re making up your connection string but that’s it, You’ve made an app in your tenant.
Configure The App To Use Certificate Based Authentication
Now that we’ve talked a bit about Service Principals, it’s important to note that there are 2 methods to authenticating to your newly created application. Those methods are using a certificate or a client secret. We’ll cover both ways in this article, but we’ll start with certificates first.
Azure allows you to use a either a self-signed certificate or a certificate from your PKI infrastructure. The more secure route of these 2 options would definitely be your PKI infrastructure, but it’s also understandable that not every environment has one. I don’t have a PKI infrastructure in my lab so I’m going to share the steps with using a self-signed certificate. The end goal is have to a .pfx on the client machine and a .cer file that’s uploaded to Azure.
#splatting for human readability
$CertParam = @{
    'KeyAlgorithm'      = 'RSA'
    'KeyLength'         = 2048
    'KeyExportPolicy'   = 'NonExportable'
    'DnsName'           = 'server.thesysadminchannel.com'
    'FriendlyName'      = 'GraphApi - My Automation App'
    'CertStoreLocation' = 'Cert:\CurrentUser\My\'
    'NotAfter'          = (Get-Date).AddYears(1)
}

#Creating self signed cert with parameters from above.
$Cert = New-SelfSignedCertificate @CertParam

Note: The DnsName should be the Server’s Fully Qualified Domain Name (FQDN)
Import Self Signed Certificate to Azure AD
Once the self signed certificate is created from above, we’ll need to export it to a .cer and upload that to Azure AD. Since we’re already in Powershell, let’s export it using Powershell.
#Since we captured the output to the $Cert variable in our previous step.  We'll use that to specify the cert parameter.
#The .cer file will exported to the user's desktop.

Export-Certificate -Cert $Cert -FilePath $Home\Desktop\MyAutomationApp.cer
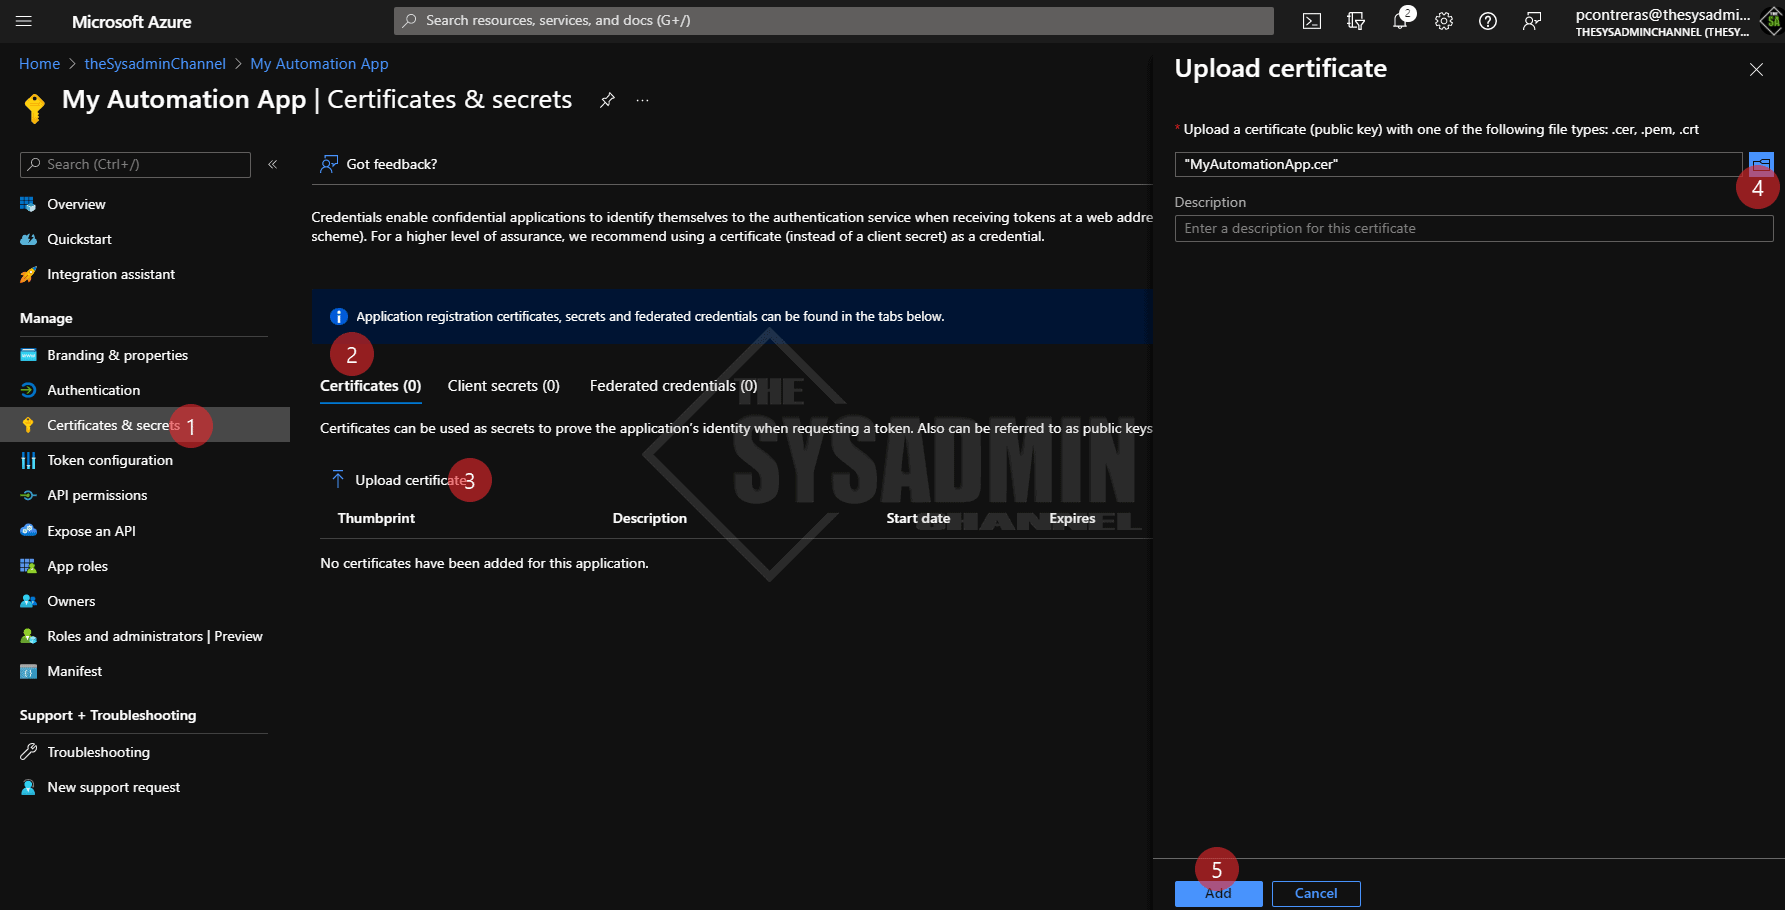
Back in Azure AD:
- Navigate to Certificates & secrets
- Click the certificates tab
- Click Upload certificate
- Click the folder icon and browse to your desktop to select the exported cert
- Click Add
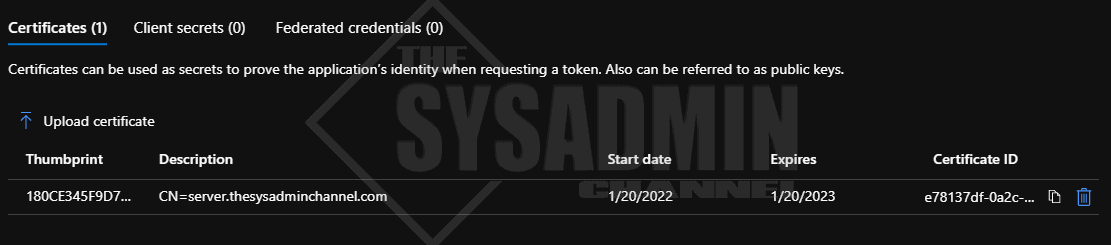
We can confirm that the certificate is now uploaded to the Azure application.
Configure The App To Use Client Secret Based Authentication
Our next option for authenticating to a Service Principal is being able to use a client secret. Not to throw shade at using secrets, but personally, I prefer using a certificate because I can get a bit more control over it and can prioritize security above all else.
What do you mean by that you may ask? Well, for one, a secret can be passed around and used anywhere just like a regular password can. Meaning a user/app owner can share this secret with other teammates and it’s up to the user to uphold the security measures.
Two, this introduces a chicken and egg scenario. Say this application was used for some kind of unattended automation, you’re going to need a way to automatically grab this secret to pass into the connection string. There are ways to programmatically retrieve this using Azure Key Vault or Secrets Management PowerShell Module but now you’ll need to store that password somewhere securely. Again, security will most likely be left to the user so your best case scenario is everything is encrypted and stored securely in a vault.
Or, worse case scenario the secret (along with the Appid and TenantId) are saved to that person’s personal github repo and has it open to the public. So before you go down this path, think about how your users would likely treat it.
Now that I got that off my chest, let’s move forward with generating a secret for your app.
Back in Azure AD:
- Navigate to Certificates & secrets
- Click the Client Secrets tab
- Click New client secret
- Enter a useful description. e.g TicketNumber and Person who’s primarily responsible for it
- Set the expiration date to the recommended 6 months
- Click Add


Important: Immediately copy the secret because once you leave the page it’s no longer accessible and you’ll have to generate a new one. Make sure it’s secured as well.
Configure API Permissions For The Application
Moving along to our next topic which will be to provide an overview of the API permissions that are going to be granted for the application. These permission sets can either be Application or Delegated. The scenario for which the application is used will most likely dictate which sets are used but let’s give a brief overview and how to set them.
Configure Application Permissions To Use For Unattended Automation
If you want your application to 100% automated, choosing Application permissions is going to be your best bet since it doesn’t require any user interaction whatsoever.
Going back into your application:
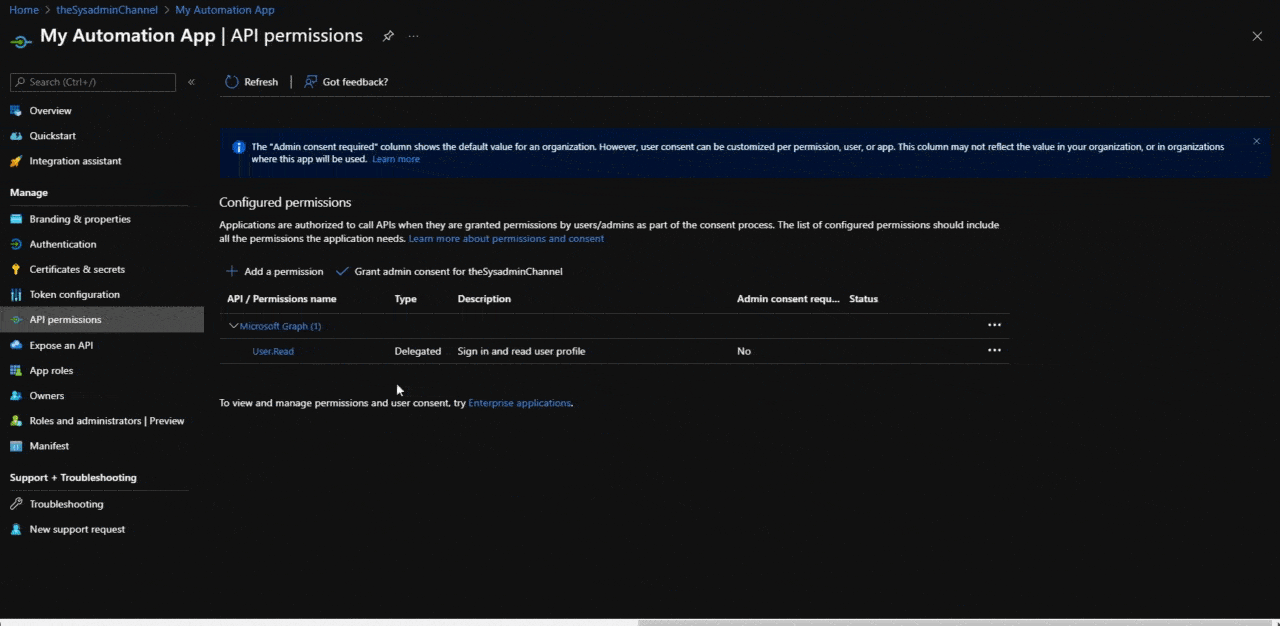
- Navigate to API permissions
- Choose Add a permission
- Choose Microsoft Graph (since this is what is most commonly used)
- Choose Application Permissions
- Select the permissions that are required for this app
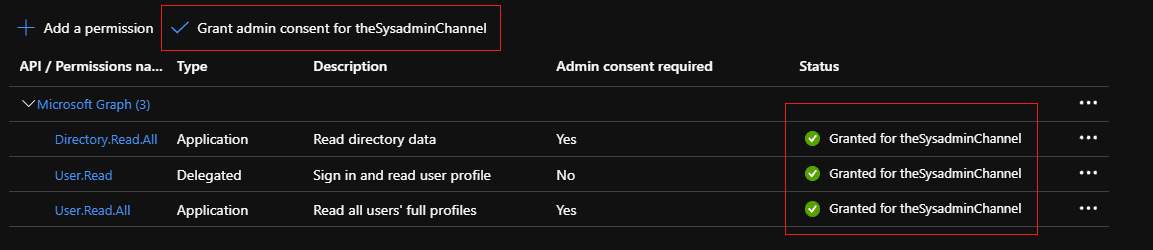
- To get started, choose Dirctory.Read.All and User.Read.All
- Click Add
- Grant admin consent for your organization
Configure Delegated Permissions To Use For Interactive Sessions
As you can see, delegated permissions are located in the same place that application permissions are so you’ll just need to select that instead of the app box.
The key take away between the 2 permissions are this:
- Delegated Permissions: Used by apps that have a signed-in user present
- Application Permissions: Used by apps that run unattended automation. Application permissions can only be consented by an administrator
Depending on the permissions applied, admin consent will also be needed for the permissions. The Admin consent required column should notify you if consent is needed.
Connect Using A Service Principal and Certificate Based Authentication
We’re finally nearing the home stretch here and got our App registration and Service Principal created. Now we just need to bring it all together to connect to Microsoft Graph API using Powershell. In this case we’re going to start off by connecting using a certificate. Here’s how we do that.
$AppId = "90cb4cab-xxxx-xxxx-xxxx-xxxxxxxxxxxx"
$TenantId = "95cb1f18-xxxx-xxxx-xxxx-xxxxxxxxxxxx"
$Certificate = Get-ChildItem Cert:\CurrentUser\My0CE345F9XXXXXXXXXXXXXXXXXXXXXXXXXXXXXX
Connect-Graph -TenantId $TenantId -AppId $AppId -Certificate $Certificate

If all is successful, you should see “Welcome To Microsoft Graph!” Congrats, you’re now successfully connected to Microsoft Graph API using certificate based authentication!
Connect Using A Service Principal and Secret Based Authentication
If you decided going the secret route was the better option for your application, let’s take a second to show you how to connect using this method. To get started you will need to install the MSAL.PS Powershell module from the PSGallery.
This module allows you to create an access token which you will need to connect to MSGraph.
#Install MSAL.PS module for all users (requires admin rights)
Install-Module MSAL.PS -Scope AllUsers -Force

#Generate Access Token to use in the connection string to MSGraph
$AppId = '90cb4cab-xxxx-xxxx-xxxx-xxxxxxxxxxxx'
$TenantId = '95cb1f18-xxxx-xxxx-xxxx-xxxxxxxxxxxx'
$ClientSecret = 'app registration secret'

Import-Module MSAL.PS
$MsalToken = Get-MsalToken -TenantId $TenantId -ClientId $AppId -ClientSecret ($ClientSecret | ConvertTo-SecureString -AsPlainText -Force)

#Connect to Graph using access token
Connect-Graph -AccessToken $MsalToken.AccessToken
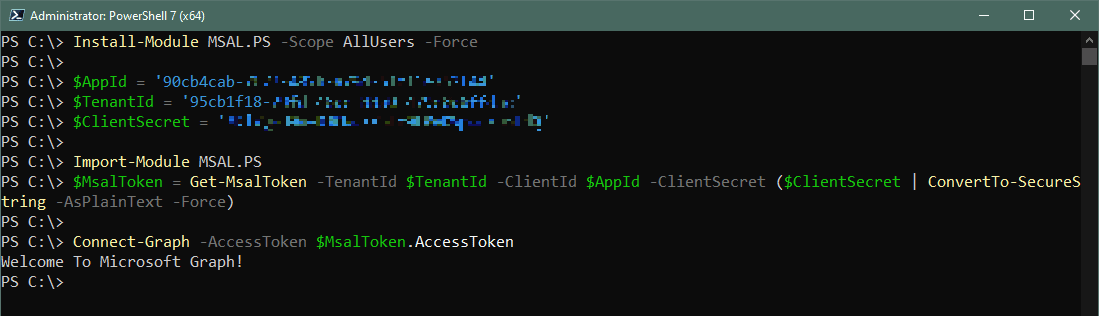
If all is successful, you should see “Welcome To Microsoft Graph!” Congrats, you’re now successfully connected to Microsoft Graph API using secret based authentication!
Set Microsoft Graph Profile to use v1.0 or Beta Versions
Microsoft has 2 versions of Graph API that we’re able to send requests to. v1.0 which is all generally available endpoints and beta, which is the prerelease version.
It’s important to note that some items will only work in the beta profile so you might want to give that a try if you see something online and want to try it for yourself. In any event, we can change profiles by using the Beta prefix on any cmdlet. Here is a simple example.
- Get-MgUser -UserId [email protected]
- Get-MgBetaUser -UserId [email protected]
Something to note when using the v1.0 and beta versions is that the beta returns more properties. The v1.0 cmdlet typically returns the skeleton properties so the query can run faster. Depending on what you’re querying, it is also a good idea to use the -Property parameter so you can get the attributes you need without having to call everything. This is essential for larger environments.
Powershell Graph API Examples
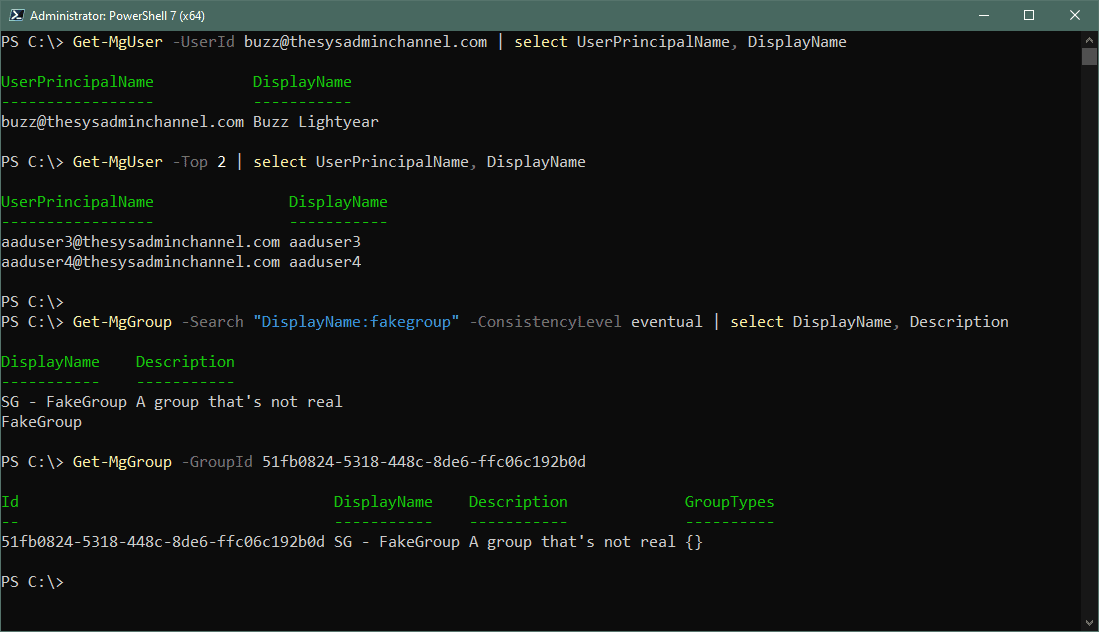
Finally we’re at a point where we’re able to connect To Microsoft Graph API using PowerShell to send some requests. I’ll get a user object and group object so you can see how quick and easy it is.
#Search user by UserPrincipalName
PS C:\> Get-MgUser -UserId [email protected] | select UserPrincipalName, DisplayName

UserPrincipalName           DisplayName
-----------------           -----------
[email protected] Buzz Lightyear

#Get Top 2 objects of Get-MgUser
PS C:\> Get-MgUser -Top 2 | select UserPrincipalName, DisplayName

UserPrincipalName               DisplayName
-----------------               -----------
[email protected] aaduser3
[email protected] aaduser4

#Get all the groups with fakegroup in the DisplayName
PS C:\> Get-MgGroup -Search "DisplayName:fakegroup" -ConsistencyLevel eventual | select DisplayName, Description

DisplayName    Description
-----------    -----------
SG - FakeGroup A group that's not real
FakeGroup

#Get group object by Id.
PS C:\> Get-MgGroup -GroupId 51fb0824-5318-448c-8de6-ffc06c192b0d

Id                                   DisplayName    Description             GroupTypes
--                                   -----------    -----------             ----------
51fb0824-5318-448c-8de6-ffc06c192b0d SG - FakeGroup A group that's not real {}

PS C:\>
Conclusion
I’m hoping this deep dive on how to connect to Microsoft Graph API using PowerShell was informative enough to get your started. As an IT Professional, this is something you can use to automate many of your Azure tasks. If you’re a developer, this can be useful to interact with other applications in your wheelhouse.
If you’re looking for more Powershell content, be sure to check out our category full of useful scripts. The same goes for Azure Active Directory. I’ll also be starting a new series of posts dedicated to Graph API so stay tuned.
Thanks, this is helpful for those of us who are migrating away from the MSOnline module for managing users. Looking back, I never realized that Connect-MSOLService was sooooo easy compared to all this Graph stuff. MS definitely isn’t making it easy for those of us who are just simple O365 admins needing to add users and assign licenses, and not full-time coders.
Thanks a lot, I need you help, suddenly it stopped working for me. It is throwing below error to me.
Connect-Mggraph -AccessToken $MsalToken.AccessToken
Connect-MgGraph : Cannot bind parameter ‘AccessToken’. Cannot convert the “eyJ0eXAiOiJKV1QiLCJub25jZSI6InVQOHVlNEl6c0ln
V1d6dGFNcWVRR2UwU3d6MHBlU0IzaWMwU01yOXYzWEkiLCJhbGciOiJSUzI1NiIsIng1dCI6Ii1LSTNROW5OUjdiUm9meG1lWm9YcWJIWkdldyIsImtpZCI
6Ii1LSTNROW5OUjdiUm9meG1lWm9YcWJIWkdldyJ9.eyJhdWQiOiJodHRwczovL2dyYXBoLm1pY3Jvc29mdC5jb20iLCJpc3MiOiJodHRwczovL3N0cy53a
W5kb3dzLm5ldC9lZGY0NDJmNS1iOTk0LTRjODYtYTEzMS1iNDJiMDNhMTZjOTUvIiwiaWF0IjoxNjg5ODU1MDg3LCJuYmYiOjE2ODk4NTUwODcsImV4cCI6
MTY4OTg1ODk4NywiYWlvIjoiRTJaZ1lKZ3N1RFZVWG8vVG9PVmUzVE8rM3dwSkFBPT0iLCJhcHBfZGlzcGxheW5hbWUiOiJDbG91ZExBUFMgLSBUTSIsImF
wcGlkIjoiMjMzYTQ5M2YtNzg0YS00ZTdlLTljMzItZGUxNDViNDdmNTNjIiwiYXBwaWRhY3IiOiIxIiwiaWRwIjoiaHR0cHM6Ly9zdHMud2luZG93cy5uZX
QvZWRmNDQyZjUtYjk5NC00Yzg2LWExMzEtYjQyYjAzYTE2Yzk1LyIsImlkdHlwIjoiYXBwIiwib2lkIjoiNTY4ZDY4MDctZTM1ZS00ZDA4LWI0OWMtYzIxM
DJlNWY1NWU5IiwicmgiOiIwLkFROEE5VUwwN1pTNWhreWhNYlFyQTZGc2xRTUFBQUFBQUFBQXdBQUFBQUFBQUFBUEFBQS4iLCJzdWIiOiI1NjhkNjgwNy1l
MzVlLTRkMDgtYjQ5Yy1jMjEwMmU1ZjU1ZTkiLCJ0ZW5hbnRfcmVnaW9uX3Njb3BlIjoiQVMiLCJ0aWQiOiJlZGY0NDJmNS1iOTk0LTRjODYtYTEzMS1iNDJ
iMDNhMTZjOTUiLCJ1dGkiOiJYd1ltM1B5RDEwR1BVaHdYY0RsOUFBIiwidmVyIjoiMS4wIiwid2lkcyI6WyIwOTk3YTFkMC0wZDFkLTRhY2ItYjQwOC1kNW
NhNzMxMjFlOTAiXSwieG1zX3RjZHQiOjE0MTQ1ODgxNzB9.k2Zf7LZmL-Js7eQXspJJ1wNsXK48uKWa0XT9-joUqZndVpeyflAqfGEGmCKZ9wIij65pvusA
LNEagdkUS2WvQoS09tt40JJVXr79yqr0Vw3UIA38Qsix9Rep-uyv_vgSbnMgfcknZIj4AetReT4l7mx7X-kLKy9WLBJnsCKVSXvZWUDy6Cz9GJkYG3y19NW
XaCmWmV74l7c9c8zcM6Q0nWki4OZ5f6yg8Ms1BRt0mWo14BF37YtEzhUhFyN7E1ogcowIh93VlD6D-DRwXQLsEKxKBUi-dtAqFr4yw6DmYyEiE-nUWAEnxd
DSNNu03orrPTEo-njqgmuqtFUwsDwJuw” value of type “System.String” to type “System.Security.SecureString”.
At line:1 char:30
+ Connect-Mggraph -AccessToken $MsalToken.AccessToken
+ ~~~~~~~~~~~~~~~~~~~~~~
+ CategoryInfo : InvalidArgument: (:) [Connect-MgGraph], ParameterBindingException
+ FullyQualifiedErrorId : CannotConvertArgumentNoMessage,Microsoft.Graph.PowerShell.Authentication.Cmdlets.Connect
MgGraph
I get get the below error when trying to connect using secret
FullyQualifiedErrorId : CannotConvertArgumentNoMessage,Microsoft.Graph.PowerShell.Authentication.Cmdlets.ConnectMgGraph
Any ideas on this, thanks
Paul, great tutorial. thanks for putting it together. simplicity at its finest. also in the near future please let me know if you plan on posting about using MS Graph API for reporting, more specifically from MS Defender like certain reports or leveraging Power BI. Thanks for a very informative tutorial.
Hi SysAdminChannel Team
Thank you for this amazing Tutorial, it work perfect for me, i would like if we have second part for this tutorial on accessing mails , calendars , Teams …etc , eventually discuss the different useful commands for each module …
I’m looking forward to a sequel for this perfect tutorial
Thanks
Thanks for the brilliant article – I had been ripping my hair out (or would’ve been if I hadn’t gone bald years ago) trying to figure out how to authenticate for New-MgUserAuthenticationTemporaryAccessPassMethod
It shouldn’t need that much digging to get a decent outline – but yours was the outline that was decent.
Thanks mate!
I’m unable to get past the following:
Get-ChildItem Cert:\CurrentUser\ADDC728B7DA662770692275D09F3XXXXXXXXXXXX
Get-ChildItem: Cannot find path ‘\CurrentUser\ADDC728B7DA662770692275D09F3XXXXXXXXXXXX’ because it does not exist.
It’s unable to find the Self signed Cert.
I had the same problem – There was a typo in the article – a missing \
Try “Get-ChildItem Cert:\CurrentUser\My\ADDC[…]”
hi everyone
You can’t use the same id for certification installed for demonstration, every certificate have its own ID
you should use your own certificate id, for this you can use this commands :
# Get the id for local App installed certificate
$ThumbApp = (Get-ChildItem “Cert:\CurrentUser\My\” | Where-Object FriendlyName -EQ ‘GraphApi – My Automation App’).Thumbprint
$Certificate = Get-ChildItem “Cert:\CurrentUser\My\$ThumbApp”
#Connect to Graph using access token
Connect-MgGraph -TenantId $TenantId -AppId $AppId -Certificate $Certificate
Hi! Great Post!!
I configured Delegated Permissions rather than Applicartion Permission and when I Connect Using A Service Principal and Secret Based Authentication, run the Get-MgContext command and I see the Scopes field empty. Then, when run Get-MgUser, I receive the following error: Insufficient privileges to complete the operation. Can you help me? Thanks!
Thank you for this, it is quality! I will be recommending this to anybody who asks about Microsoft Graph API.
I have wanted to get to grips with Microsoft Graph API for some time now and I have followed your guide step-by-step and have got it configured. This is such an excellent guide and I thank you for making this, it has really helped me understand it and will certainly help me automate some user onboarding / off boarding tasks in the near future.
Thank you once again.
Hi Nate – thank you for the kind words. I really appreciate the feedback.
Thank you for a great description 🙂
We use a lot of scripts on our customer-tenants that we need to re-make now that the old powershell api’s are depreciated, and this will help.
Do you know if the procedures you describe is possbile to do with powershell? We have several hundred tenants we administer, so it will be a huge undertaking to do all this manually in every tenant….