What is DKIM
DomainKey Identified Mail, otherwise known as DKIM, is a used to validate your email by digitally signing your mail to help protect senders and recipients from forged and phishing email. When you setup DKIM in Office 365, you authorize your domain to sign its name to an email message by using cryptographic authentication.
External domains that receive email from your domain can use this digital signature to help determine if incoming email that they receive is legitimate. So, for the sake of good security, we should enable DKIM in Office 365 because it is considered a much stronger form of authentication than SPF and should be used in conjunction with SPF and DMARC in your environment.
How To Enable DKIM in Office 365
By default, Office 365 enables DKIM for your .onmicrosoft.com domain but let’s look at the steps to enable DKIM for your custom domain. In my example I am going to setup DKIM for thesysadminchannel.com domain because that’s the domain that’s being used for email.
There is a prerequisite that you must make in order to configure DKIM for your domain, and that’s to publish the DNS records in your registrar. If you try to enable it before you publish the DNS records, you’ll get a error like this.
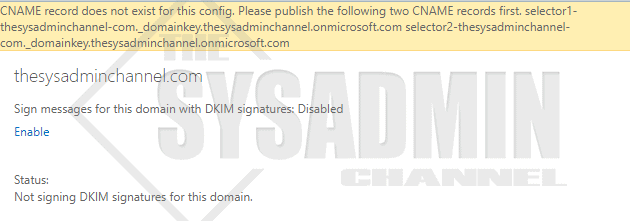
CNAME record does not exist for this config. Please publish the following two CNAME records first.
selector1-thesysadminchannel-com._domainkey.thesysadminchannel.onmicrosoft.com
selector2-thesysadminchannel-com._domainkey.thesysadminchannel.onmicrosoft.com
- Login to your DNS Hosting provider. I am using CloudFlare so we’ll make changes there
- Create a new CNAME Record
- In the name field, type: selector1._domainkey
- In the value field, type: selector1-thesysadminchannel-com._domainkey.thesysadminchannel.onmicrosoft.com
- Set TTL to 5 minutes to allow for a quick DNS propogation. Be sure to change to 1 hour afterwords
- Create a second CNAME and copy the values, but change the 1 to 2 (It’s easiest to copy the error)
- Wait. It might take 5 minutes to an hour depending on your TTL records
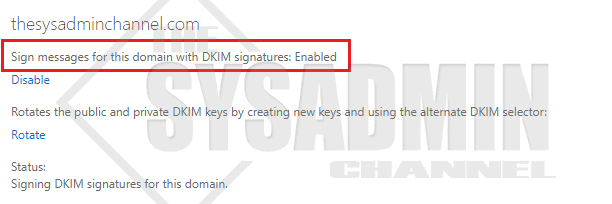
Once we’ve waited a generous amount of time we can head back to Exchange Online to complete the configuration. Within Office 365 Exchange Admin Center, Navigate to Protection -> DKIM and click Enable. If successful, it should look like the screenshot below.
How To Check If DKIM is Enabled and Working
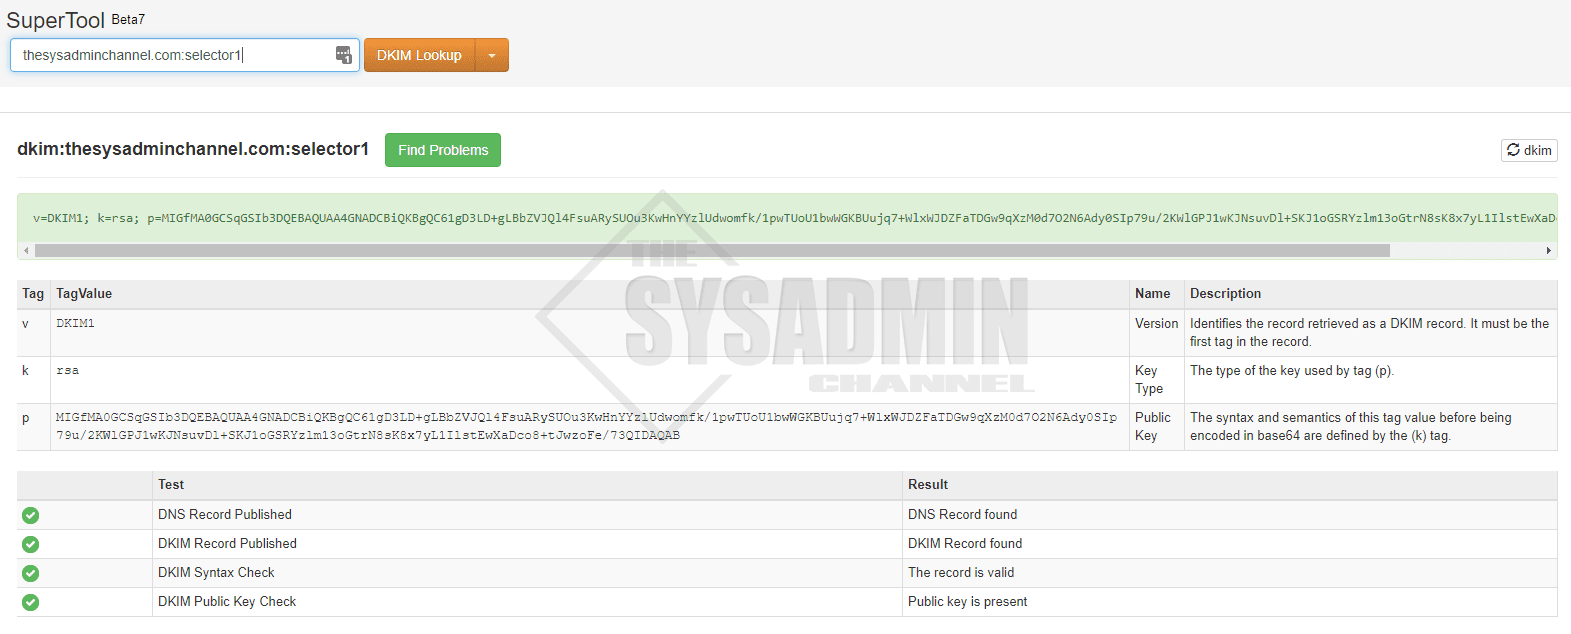
Now that we have enabled DKIM for our custom domain, we want to make sure everything is working as expected. So now the question is, how can we check to see if DKIM is enabled and working? Let’s head on over to https://mxtoolbox.com/dkim.aspx so they can do the heavy lifting for us. For here, enter in your domain name and for selector, type in selector1.

Now when we send an email we will see in the headers that DKIM is allowing thesysadminchannel.com which is what we want to see.
ARC-Authentication-Results: i=2; mx.google.com;

dkim=pass [email protected] header.s=selector1 header.b=Ltm8x9Fw;
As mentioned, once you have setup DKIM for Office 365, I would strongly suggest you also setup DMARC (Domain-based Message Authentication, Reporting & Conformance) to strengthen your security footprint.
As always, thank you for taking the time to stop by and feel free to drop a comment if you have any questions. If you’re interested in more sysadmin content, take a look at our Youtube Channel for awesome tips and tools for your everyday work-life.
This was incredibly helpful and really well thought out. Thank you from someone starting their own business and needing help setting this up!
I’m giving it some time to process to ensure I got this correct, FYI this part I could not follow, not sure if the admin portal changed.
Within Office 365 Exchange Admin Center, Navigate to Protection -> DKIM and click Enable