So you’re looking to create O365 Mailboxes in Hybrid Exchange, right? As more and more companies move over the to the cloud it’s absolutely essential to keep operations moving along seamlessly. If you’re one of those companies that just migrated over to Office 365, congratulations! Having a hosted exchange will hopefully free up some time since you’re no longer patching, maintaining or upgrading the bulk of the servers that keep this critical service up and running. The question that many new people seem to have after migrating to O365 is… How do I create a mailbox for a new user when I’m using a hybrid exchange. The quick answer my friend is: New-RemoteMailbox– In this article I’m going to go over both the GUI method and the Powershell way to creating user accounts with office 365. Hopefully this will clear up some question you may have.
As someone who has managed a hybrid exchange for several years now I can tell you from personal experience I had a lot of questions that needed answers, and my google-fu wasn’t always on point. So if you get frustrated, no worries. It happens and it’s part of the job. Luckily I was able to learn from my mistakes through trial and error and share them now, with you. So, there are basically two ways of creating the accounts, the user-friendly GUI, and the Powershell way (I love the Powershell way because it makes for easy automation.)
Before continuing, I am going to assume you have the permissions to create these accounts and exchange mailboxes. If you need help assigning these permissions, be sure to leave a comment I’ll do my best to assist.
Create O365 Mailboxes in the GUI:
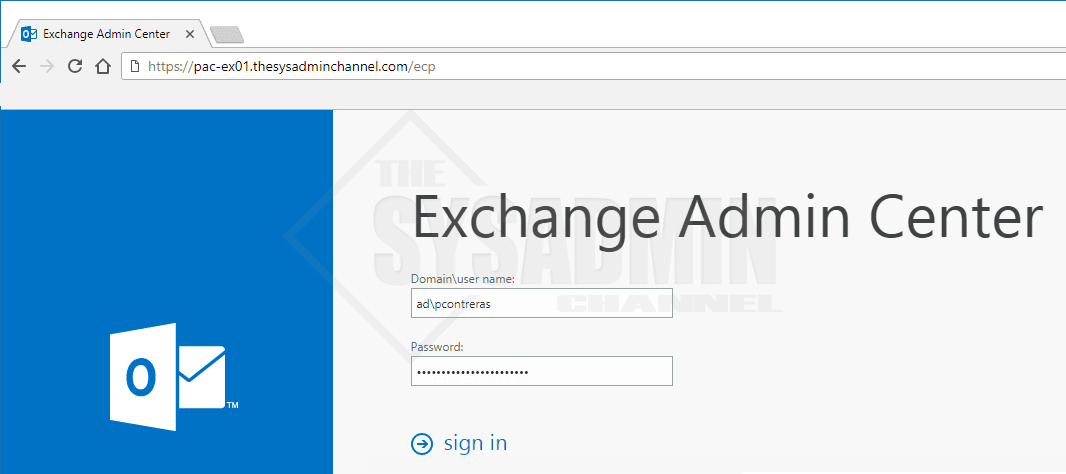
- Login to your On-Premise exchange server with the proper credentials. (Normally it would be something like: https://<your-onprem-exchange-server.domain.com>/ecp
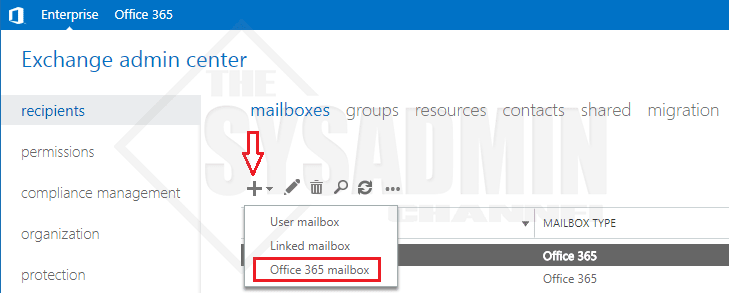
- Next, under Recipients -> Mailboxes you should see the “+” symbol with a drop down for Office 365 Mailbox.
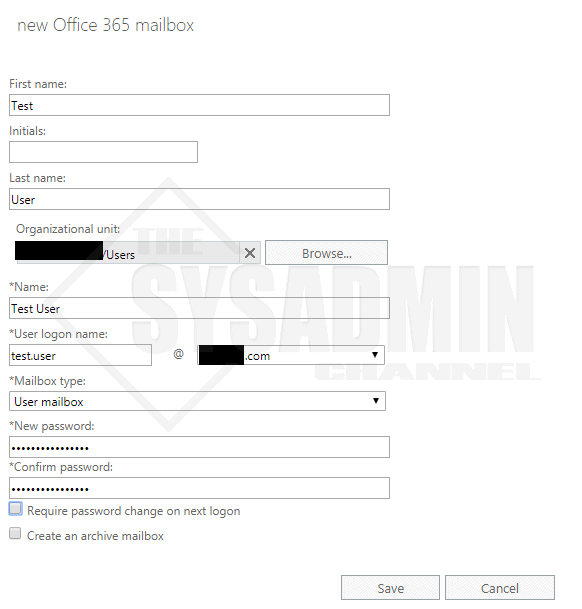
- Fill out the user information as you normally would.
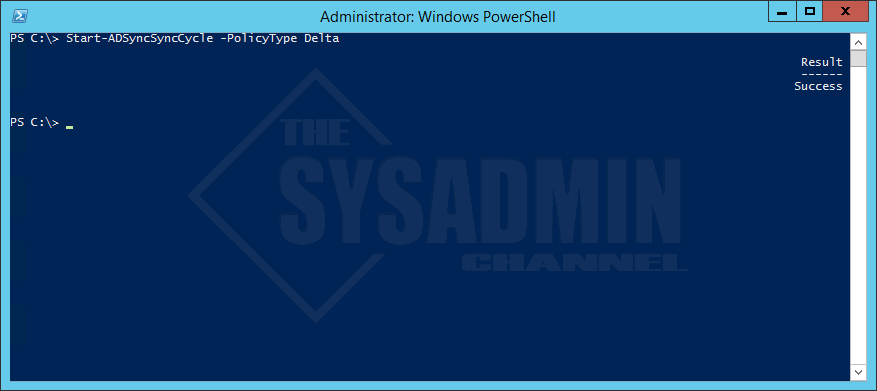
- Now you can either wait until the next AD Sync cycle runs or you can manually force the sync so your user shows up in Office 365.
- To manually force the sync cycle, login to your AD Connect server and open a Administrative Powershell window.
- Type in Start-ADSyncSyncCycle -PolicyType Delta
- Now that you’ve run the ADSync, browse on over to https://portal.office.com/adminportal/home#/homepage
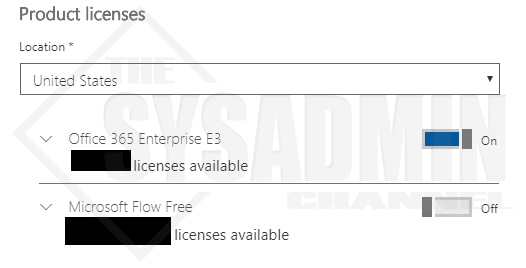
- In the search you should be able to see the user you just created after typing in the name. Click on that user and select Product Licenses.
- Assign the appropriate license for your org.
Create O365 Mailboxes in Powershell:
Just copy the contents of this script to any location on your hard drive.. Then run the file in a Administrative Powershell window.
#requires -Module ActiveDirectory
#requires -RunAsAdministrator
#Import-Module ActiveDirectory -EA Stop

<#
.Synopsis
    This will create a user with a mailbox in Office365 in Hybrid Exchange.
    For updated help and examples refer to -Online version.


.DESCRIPTION
    Used to create user accounts in Exchange hybrid mode.
    For updated help and examples refer to -Online version.


.NOTES
    Name: O365-NewUserAccountCreation
    Author: The Sysadmin Channel
    Version: 1.01
    DateCreated: 2017-Apr-09
    DateUpdated: 2017-Apr-09

.LINK
    https://thesysadminchannel.com/how-to-create-o365-mailboxes-hybrid-exchange/ -


.EXAMPLE
    For updated help and examples refer to -Online version.

#>


$Creds = Get-Credential
$ExchangeServer = Read-Host "Enter in the FQDN for your OnPrem exchange server."


Write-Output "Importing Active Directory Module"
Import-Module ActiveDirectory
Write-Host "Done..."
Write-Host
Write-Host


Write-Output "Importing OnPrem Exchange Module"
$OnPrem = New-PSSession -ConfigurationName Microsoft.Exchange -ConnectionUri http://$ExchangeServer/powershell -Credential $Creds
Import-PSSession $OnPrem | Out-Null
Write-Host "Done..."
Write-Host
Write-Host


Sleep 4
cls
Write-Host "Before we create the account"
$CopyUser = Read-Host "Would you like to copy from another user? (y/n)"
Write-Host

    Do {
        if ($CopyUser -ieq 'y') {
         $CUser = Read-Host "Enter in the USERNAME that you would like to copy FROM"
         Write-Host


            Write-Host "Checking if $CUser is a valid user..." -ForegroundColor:Green
            If ($(Get-ADUser -Filter {SamAccountName -eq $CUser})) {
            Write-Host "Copying from user account" (Get-ADUser $CUser | select -ExpandProperty DistinguishedName)
            Write-Host

            $Proceed = Read-Host "Continue? (y/n)"
            Write-Host


                if ($Proceed -ieq 'y') {
                    $CUser = Get-ADUser $CUser -Properties *
                    $Exit = $true
                }

            } else {
            Write-Host "$CUser was not a valid user" -ForegroundColor:Red
            Sleep 4
            $Exit = $false
            cls
            }

        } else {
        $Exit = $true
        }

    } until ($Exit -eq $true)


cls
Write-Host "Gathering information for new account creation."
Write-Host
$firstname = Read-Host "Enter in the First Name"
Write-Host
$lastname = Read-Host "Enter in the Last Name"
Write-Host
$fullname = "$firstname $lastname"
#Write-Host
$i = 1
$logonname = $firstname.substring(0,$i) + $lastname
#Write-Host
#$EmployeeID = Read-Host "Enter in the Employee ID"
#Write-Host
$password = Read-Host "Enter in the password" -AsSecureString

$domain = Get-WmiObject -Class Win32_ComputerSystem | select -ExpandProperty Domain

$server = Get-ADDomain | select -ExpandProperty PDCEmulator

    if ($CUser)
    {
    #Getting OU from the copied User.
        $Object = $CUser | select -ExpandProperty DistinguishedName
        $pos = $Object.IndexOf(",OU")
        $OU = $Object.Substring($pos+1)


    #Getting Description from the copied User.
        $Description = $CUser.description

    #Getting Office from the copied User.
        $Office = $CUser.Office

    #Getting Street Address from the copied User.
        $StreetAddress = $CUser.StreetAddress

    #Getting City from copied user.
        $City = $CUser.City

    #Getting State from copied user.
        $State = $CUser.State

    #Getting PostalCode from copied user.
        $PostalCode = $CUser.PostalCode

    #Getting Country from copied user.
        $Country = $CUser.Country

    #Getting Title from copied user.
        $Title = $CUser.Title

    #Getting Department from copied user.
        $Department = $CUser.Department

    #Getting Company from copied user.
        $Company = $CUser.Company

    #Getting Manager from copied user.
        $Manager = $CUser.Manager

    #Getting Membership groups from copied user.
        $MemberOf = Get-ADPrincipalGroupMembership $CUser | Where-Object {$_.Name -ine "Domain Users"}


    } else {
    #Getting the default Users OU for the domain.
        $OU = (Get-ADObject -Filter 'ObjectClass -eq "Domain"' -Properties wellKnownObjects).wellKnownObjects | Select-String -Pattern 'CN=Users'
        $OU = $OU.ToString().Split(':')[3]

    }


cls
Write-Host "======================================="
Write-Host
Write-Host "Firstname:      $firstname"
Write-Host "Lastname:       $lastname"
Write-Host "Display name:   $fullname"
Write-Host "Logon name:     $logonname"
Write-Host "Email Address:  $logonname@$domain"
Write-Host "OU:             $OU"


DO
{
If ($(Get-ADUser -Filter {SamAccountName -eq $logonname})) {
        Write-Host "WARNING: Logon name" $logonname.toUpper() "already exists!!" -ForegroundColor:Green
        $i++
        $logonname = $firstname.substring(0,$i) + $lastname
        Write-Host
        Write-Host
        Write-Host "Changing Logon name to" $logonname.toUpper() -ForegroundColor:Green
        Write-Host
        $taken = $true
        sleep 4
    } else {
    $taken = $false
    }
} Until ($taken -eq $false)
$logonname = $logonname.toLower()
Sleep 3

cls
Write-Host "======================================="
Write-Host
Write-Host "Firstname:      $firstname"
Write-Host "Lastname:       $lastname"
Write-Host "Display name:   $fullname"
Write-Host "Logon name:     $logonname"
Write-Host "Email Address:  $logonname@$domain"
Write-Host "OU:             $OU"
Write-Host
Write-Host

Write-Host "Continuing will create the AD account and O365 Email." -ForegroundColor:Green
Write-Host
$Proceed = $null
$Proceed = Read-Host "Continue? (y/n)"

    if ($Proceed -ieq 'y') {

        Write-Host "Creating the O365 mailbox and AD Account."
        New-RemoteMailbox -Name $fullname -FirstName $firstname -LastName $lastname -DisplayName $fullname -SamAccountName $logonname -UserPrincipalName $logonname@$domain -PrimarySmtpAddress $logonname@$domain -Password $password -OnPremisesOrganizationalUnit $OU -DomainController $Server
        Write-Host "Done..."
        Write-Host
        Write-Host
        Sleep 5


        Write-Host "Adding Properties to the new user account."
        Get-ADUser $logonname -Server $Server | Set-ADUser -Server $Server -Description $Description -Office $Office -StreetAddress $StreetAddress -City $City -State $State -PostalCode $PostalCode -Country $Country -Title $Title -Department $Department -Company $Company -Manager $Manager -EmployeeID $EmployeeID
        Write-Host "Done..."
        Write-Host
        Write-Host

        if ($MemberOf) {
            Write-Host "Adding Membership Groups to the new user account."
            Get-ADUser $logonname -Server $Server  | Add-ADPrincipalGroupMembership -Server $Server -MemberOf $MemberOf
            Write-Host "Done..."
            Write-Host
            Write-Host
        }
    }


Get-PSSession | Remove-PSSession
And there you have it, your account is now created in Office 365 with a brand new mailbox. You will still need to apply a license to the user account in order to retain the mailbox and keep it active.
Hopefully this article was able to clear up some questions and automate the creation of Office 365 mailbox in Hybrid Exchange. If you would like more awesome sysadmin content, be sure to check out our Youtube Channel for video demos and other cool sysadmin stuff.
when you copy a user, instead of it finding the OU as CN=Users,DC=Domain,DC=com it finds it as CN=User Name,CN=Users,DC=Domain,DC=com where is this being pulled from and why is it not looking at the OU, but rather at the source user’s distinguished name in full? the script fails because that full OU containing the source’s user name does not exist
Thanks for this! I just tweaked it to not pull Exchange related items now that Microsoft released content on removing the Exchange server entirely. Saved me days of coding 🙂
how do I do a bulk creation from a CSV?